Howto & Guides, PC Guides
Discjuggler on Windows 10
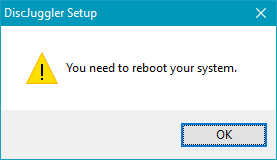
If you’ve upgraded your PC to Windows 10 and tried to install or re-install DiscJuggler, you’ve probably encountered the error below when trying to start the installer.
Unfortunately, no matter how many times you reboot your PC, or what compatibility options you apply to the installer, it simply won’t progress past this stage. Padus don’t really support DiscJuggler any more, so we’re unlikely to see an official fix from them. Given that the DiscJuggler .cdi format is used extensively for Dreamcast homebrew and applications and is the best supported format for the Sega Saturn optical drive emulator Rhea, loosing DiscJuggler support in Windows 10 is a bit of a blow.
There’s some good news however, the incompatibility seems to be entirely with the programs installer and not with DiscJuggler itself. To get the program installed on Windows 10 just follow this workaround.
First of all, find an older PC running Windows XP, Vista or Windows 7. Windows 8 probably works too though I’ve not tested it. You can also use a virtual machine, I used Windows XP running in VMWare Player.
Install DiscJuggler to your old or virtual PC as normal. The default install directory is C:\Program Files\Padus\DiscJuggler or C:\Program Files (x86)\Padus\DiscJuggler. When installation is complete, browse to C:\Program Files\Padus and copy the entire “DiscJuggler” folder to a USB stick, or burn it to a CD/DVD if you’re feeling old school. You could even use DiscJuggler for this if you wanted.
Take your removable media and insert it into your Windows 10 PC. Copy the DiscJuggler folder to your program files (x86) folder or any convenient location.
Fire up the Windows registry editor by searching for “Regedit” then right clicking on the icon that appears and choosing “Run as administrator”. If you’re completely new to this tool, there’s a little beginners video guide here you might want to watch.
In Regedit, navigate to “HKEY_LOCAL_MACHINE\SOFTWARE\WOW6432Node”. Now, right click and add a new key called “Padus”. Note that if you’re on a 32 bit version (why are you still using a 32 bit Windows?) you should navigate to “HKEY_LOCAL_MACHINE\SOFTWARE” instead.
Add another sub-key under “Padus” called “DiscJuggler”, then another key under that called “Settings”.
Finally, in the “Settings” key you just created, add the following strings and their values:-
Company – Can be left blank.
Registration – Enter your serial number here, each group of four characters separated by a dash.
User – Anything you like.
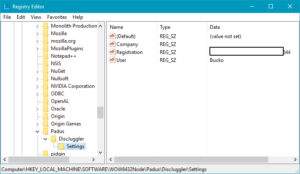
If you did that all correctly, the regedit window should resemble mine here.
Everything is now set, you can run and use DiscJuggler on your shiny new Windows 10 by simply running the “Cdj.exe” from within the folder you copied over. Follow this tutorial here (made for Windows 7 but works on 10 too) to create a Start menu shortcut, if desired.


Installing DiscJuggler onto an old Windows (using a VM or a old PC) is not necessary.
Instead just extract the setup executable of DiscJuggler with 7-Zip into a folder. To start DiskJuggler, run the cdj.exe file from that folder.
Note: creating the Registry keys as shown here is only useful if you have a license key, not necessary otherwise.