By the launch of the original Dreamcast in 1999, optical media had established itself as the media of choice for distributing games software. The high capacity and ease of duplication that optical media offered revolutionised how games were developed and delivered to consumers, doing away with error-prone magnetic media and the durable but limited capacities of cartridges. Despite promises from the industry that CDs and DVDs would be nearly indestructible, as time has gone by, optical discs and their associated drives have proven to be one of the least reliable components in retro consoles. Optical media has proven to be much more vulnerable to degradation than was previously thought. Furthermore, optical drives themselves feature moving, mechanical components and are prone to wear and tear. To combat this growing problem, a number of innovative hardware projects have appeared that allow for a consoles old optical drive to be replaced with a more modern, flash media based storage device.
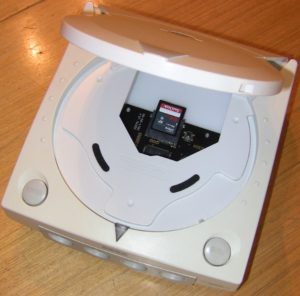
The GDEmu device was one of the first such optical drive replacements. Originally launching in 2014, the unit has seen some significant improvements since it first launched. The GDEmu we are reviewing today was kindly loaned to us by Videogameperfection.com reader and fan Clarke Gibson. We received the unit pre-installed into a Dreamcast, though if you’re buying the unit new, installation is relatively easy and requires no soldering. All that is required is for the Dreamcast to be carefully dismantled and for the consoles GD-ROM unit to be carefully removed then replaced with the GDEmu PCB. After installing the board and then reassembling your Dreamcast, you can open the consoles lid and access the SD reader on the GDEmu board. As with the Rhea, the SD reader for the Sega Saturn, once installed there’s quite a bit of empty space around the board, so be careful not to drop your SD card when inserting or removing it.
Setting out the SD card
To use GDEmu you will need image files of the games you want to play. For best results, these images should be in .CDI format (DiscJuggler) or Raw GD-ROM rips. Unfortunately, due to the unusual nature of the Dreamcast’s GD-ROM discs, you can’t simply put your Dreamcast games into your PCs optical drive and convert them. The easiest way to convert a game is to use a Dreamcast Serial to SD card adapter in a Dreamcast console that still has its GD-ROM drive attached. You can then use a program called “Dreamshell” to copy the contents of the GD-ROM to a file on your SD card reader. One the transfer is done, you can take the image and copy it to the SD card you’re using for your GDEmu. The process is a little slow, since data can only be transferred at serial port speeds, but it does work. Since we reviewed the Rhea, the UK law on format shifting your own discs/media changed yet again, and regrettably it may now once again be (technically) illegal to do so, but we’re not legal experts here so we can’t say for sure. It seems rather absurd that you could be breaking the law simply for converting your old Dreamcast games into a new format, but then again copyright law can be absurd sometimes. Of course, we’re not naive enough to think that most folks won’t just acquire the images they want to play from some corner of the internet and while this might certainly be illegal (especially if you don’t own said game already) it is undoubtedly the most convenient method of getting the games onto your SD card.
Just like with the Rhea, when you have your image files, you need to copy them onto your SD card, but you can’t just throw them on in any old fashion. You need to set out your SD card according to the instructions here. In a nutshell, you create numbered directories for each image starting at 01 (or 02 if you don’t want the Dreamcast to auto-boot) and then place your image files in the directories accordingly. You can then take your card and pop it into your GDEmu equipped Dreamcast.
Apart from the SD reader itself, there’s one push-button on the GDEmu board. You can push this button to cycle through directories on your SD card. So, if you had a game in folder 04, you’d press the button three times to advance to this folder. You can then start the game in the usual way by selecting “Play” on the Dreamcast’s menu. For some time this was the only way of using the GDEmu, but now, thanks to some clever homebrew programming developments, things have vastly improved.
Enter GDmenu

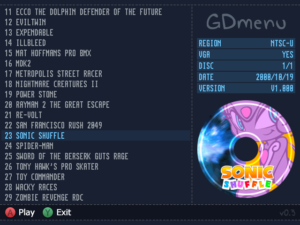
There’s little doubt that the push button system of cycling through games on the GDEmu made using more than a handful of games at once simply too inconvenient. Luckily, all that changed when GDmenu came along. By downloading this software and placing it in the first (01) folder on your SD card, you effectively give GDEmu a fully-fledged GUI. To start a game, simply use the controller to select it from the list and then press the A button.
GDmenu is a tremendous enhancement to the GDEmu, though it’s not without some drawbacks and limitations. First of all it does increase loading times, as you have to wait a few seconds for GDmenu to start and then, of course, your console effectively resets and starts to load again once you have chosen a game. You will find yourself repeatedly pressing the controller to skip that iconic Dreamcast startup animation. Furthermore, there’s no sorting your games into alphabetical order, or categories or anything advanced like that. Your games always show up in the order they are on the SD card. Nevertheless, it’s a huge improvement on the original hardware and makes switching between a few dozen games on your SD card a breeze. You can get the latest version of GDmenu here.
Playing games
After you’ve started a game from your GDEmu, there’s really nothing else left to do. By accurately emulating the behaviour of the original optical drive, GDEmu is compatible with every single Dreamcast game ever released. Indeed, as far as the Dreamcast itself is concerned, there’s no difference between GDEmu and a GD-ROM drive. GDEmu will load slightly faster than a real GD-ROM drive since there’s basically zero seek time (the time it takes for the consoles laser to move to a different part of the disc). Multi-disc games are supported, simply push the button inside the console to advance to the next disc.
Alternative GD-ROM alternatives
Since GDEmu released, not only has it improved thanks largely to GDmenu, but several alternatives have appeared too. First of all, there’s the Dreamcast USB -GDROM controller. This hardware is similar to the GDEmu but with two key differences. Firstly, it uses USB mass-storage devices rather than SD cards and secondly it comes with a full menu system that supports sub-directories. This means, of course, you can organise your GD-ROM collection however you want. It’s more expensive than GDEmu, but with its improved menu and storage capability, it could be attractive to Dreamcast gamers with huge libraries of games.
Secondly, there’s the Sega Dreamcast IDE / G1-ATA mod. This clever modification adds an old-style parallel ATA port to your Dreamcast, without removing the GD-ROM drive. You can then use the Dreamshell software to run games. Game compatibility is good, but not 100% yet. Documentation on the mod is also patchy at best, making it difficult to carry out even if you are an expert at soldering.
Conclusions
GDEmu remains a great little device and a fantastic achievement in hardware engineering. We said the same thing in the Rhea review, but it’s worth stating again, by removing the single most unreliable component from the Dreamcast, Deunan has extended the useful life of thousands of consoles around the world. For this reason alone, retro gamers and videogame historians should salute him. Add GDmenu to your GDEmu and you get a device that’s easy to use, robust and that can play any Dreamcast game, on the original hardware, without worrying about the fragility and unreliability of optical media. While we haven’t reviewed or even had chance to use the Dreamcast USB-GDROM controller, it’s additional features and storage space are attractive and if money is no object it may be more appealing depending on your needs. GDEmu breathes new life into your Dreamcast, if you can get your hands on one you will not be disappointed.


With the GREMU you don’t need to do a BIOS replacement to BIOS free
Rather Dreamcast USB GDROM over this anyday!
Also, if you check out the GDEmu site there used to be a PC tool for arranging the games into preferred order on the card; which I have but can’t see on the site anymore.
Fantastic stuff. Never owned a Dreamcast, but this certainly makes it more appealing today. Disc degradation is something I hadn’t really considered. Over the years I have collected a lot of games for consoles with optical media, so I realize I’m in a vulnerable position. Would love to see something like this for the Gamecube.
Whoops, 12v, not 5v!
The only drawback I found with the unit is the increased heat generated by the PSU in the absence of the GDROM drive. From what I can gather this is from the lower power consumption of the GDEmu and it causes some kind of spike.
A solution I found was to insert a 9k resistor between the 5v and ground pins on the PSU. It’s now nice and cool. Accurate and nicely written review as usual. Great piece of kit too.
Thanks for that, I had heard of some other folks saying similar. Once we’re up and running with Dreamcast mods I’ll offer that for other owners who may not be confident doing that themselves.