Controllers & Adapters, Reviews
Dreamconn Wireless Dreamcast Controller Review
 The ingenuity of the retro gaming community never ceases to amaze us. Just a few days ago we were reviewing the GDEmu board for the Dreamcast, a device that replaces the consoles optical drive with an SD card reader. Such things were pipe-dreams not so long ago, now they are starting to appear for all older optical drive based systems. Continuing on the trend of incredible hardware developed by hobbyist engineers comes the Dreamconn wireless Dreamcast controller. Now in its third revision, this exciting product lets you add wireless controllers to your classic Dreamcast console.
Cutting the cords
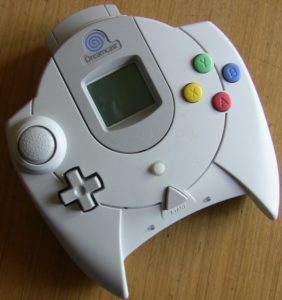
The first thing you notice about the Dreamconn controller is how professional it looks. We’re used to giving homebrew and hobbyist projects a little leeway when it comes to aesthetics and casing, but the Dreamconn is so professionally made that it could quite easily be mistaken for an official controller rather than something that’s been modded and converted. At the bottom of the controller there are two LEDs, one of these lights when the controller is charging and the other lights when it is powered on. Above the start button there’s now a push button that powers the controller on and off. To charge the controller, you attach the supplied USB charging cable to the socket in the base of the unit, where the controller cord would have been originally.
To use the controller with your Dreamcast, you simply insert the L shaped ‘dongle’ into the Dreamcast’s controller port, power on the Dreamcast, then press the power button on the Dreamconn. After a second or so the controller will find the Dreamcast and pair itself automatically. That’s all you need to do to start using the unit. Although we only had one controller, up to four are supported and will pair automatically.
Dreamconn’s wireless technology is apparently based on Bluetooth tech. Hardcore gamers are probably wondering if this means that there’s input lag when using the Dreamconn. Unfortunately there’s really no accurate way to measure. To test the unit, we used the wonderfully surreal rhythm action game “Space Channel 5”. Being a rhythm game, timing is essential and it’s often unplayable in emulators due to the extra lag that’s introduced. Using the Dreamconn we were still able to bust a move with Ulala, certainly much better than we were able to in Demul (a PC Dreamcast emulator). We also gave the frantic bullet hell shooter Giga Wing a go and didn’t feel that it was excessively laggy. Certainly, if there is any input lag, it’s not enough to affect general, recreational gaming. If you’re playing a fighting game competitively, or going for a 1 credit clear on a bullet hell shooter, you might want to switch back to a wired pad just to be sure, but for regular gaming the Dreamconn is perfectly fine.
Thanks for the VMUs
Just creating a wireless Dreamcast controller might be enough of an achievement for some folks, but Dreamconn goes even further. The controller includes not one but two internal memory units. These built in memory cards virtually occupy the two VMU slots in the controller. With no physical VMU in the controller, you can access the virtual/internal memory cards in the consoles memory manager or in a game. If you attach a regular Dreamcast memory card to the controller, you won’t be able to access its contents. You will, however, be able to use the LCD on the VMU, which will show a handy number indicator showing which controller is pared to which port. It will also show the regular little VMU animations and pictures that some games generate. If you attach a rumble pack to the bottom controller port (Dreamconn fully supports the rumble pack), the second virtual memory card is disabled.
If you want to copy between the Dreamconn’s virtual VMUs and a real Sega Dreamcast memory card, you simply need to attach a regular, wired Dreamcast controller to another controller port on the console. You can then freely move and exchange save games (except copy protected save games) between the real VMU and the virtual one on the Dreamconn.
PC Mode
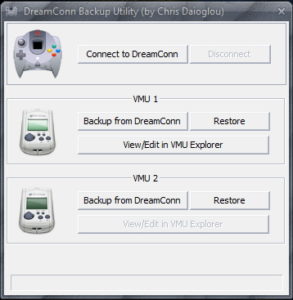
 The Dreamconn has another trick up its invisible, wireless sleeve and that’s the PC connection mode. You might assume that the supplied USB cable is used for connecting to the PC but that isn’t the case. Instead, you need a Bluetooth radio in your PC. The connection procedure seems a little strange at first. The controller itself must be powered OFF, and instead your Dreamcast needs to be powered on. Obviously, you will need your Dreamcast in close proximity to your PC for this to work. Once you have everything in the correct configuration, it’s a matter of going to the PCs bluetooth settings and pairing the Dreamconn with the PC. Once done, you can then run the Dreamconn backup utility.
Using the Dreamconn backup utility you can dump the contents of the Dreamconn’s virtual memory cards to the PC. Once on the PC, you can edit their contents, delete, replace or update save games and then re-upload the file to the Dreamconn. You can also take the virtual memory card dump and use it on a PC Dreamcast emulator, such as Demul. You can use this functionality at any time. For instance, you could pause you current game, power off the controller and access the backup utility to instantly manipulate a save game.
Unfortunately, we had a lot of difficulties using this feature. Frequently the program would simply timeout when transferring data between the PC and the Dreamconn, in fact it took around 5 tries just to get a successful dump downloaded from the controller. If you use this feature to manage save games, you’re going to want to make sure you have a full backup of anything important, particularly before you try to re-upload any data to the controller. It’s a shame this feature turned out to be unreliable, had it worked a little better then it would have been even more useful. Note – After we published this review, chrisvcpp contacted us to say he’d extensively tested the Bluetooth software on his laptop and never had an issue, so the reliability of feature may simply depend on the Bluetooth adapter you’re using in your PC.
Conclusions
The Dreamconn is a really polished bit of homebrew engineering. Cutting down on wire clutter is great in its own right and the virtual memory cards are a great little addition. It’s a shame the PC software doesn’t work a little better, though with persistence it does work well enough to make backups of your save games. However, the thing that is likely to put most folks off is the cost. A single Dreamconn controller costs $150. That’s an eye-watering $600 if you wanted to buy a wireless controller for each controller port. We don’t think it’s fair to say that the Dreamconn is overpriced, given that these units are hand-made to a very high standard and offer a huge amount of functionality, but at this price it might just be a luxury that few can afford. If you are willing to pay the premium though, the Dreamconn is unlikely to disappoint you.


thanks for the review, just bought one, version 4.0 now