AV Equipment, Reviews
XRGB Mini Framemeister – A PAL torture test
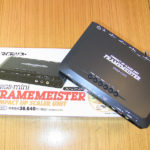
The latest in Micomsoft’s line of upscalers has been available for some time now. There’s already an extensive review of the units capabilities conducted by video processing expert Tobias “Fudoh” Reich which you can read here. Since firmware 1.07 however, the Mini has also had support for PAL sources. I’ve always been a huge fan of the Amiga range of computers. During the 90’s this was my desktop as well as my only games machine, so I have a lot of fond memories of gaming on the system. Although the Amiga got some truly terrible ports compared to the Megadrive and the SNES, it also had some tremendous exclusives and there’s plenty of hidden gems to discover. The Amiga was a lot more successful in Europe than the states and it was virtually unheard of in Japan where NEC’s range of PC98 machines dominated until Windows 95 came along. This means that the bulk of the Amiga’s games are PAL. Many Amiga games will run in 60hz mode too but a significant number only work in PAL. With this in mind, it’s the perfect system to test PAL handling on the Mini.
Configuring the Mini
One thing you notice about the XRGB Mini is it’s almost insane amount of settings. There’s so much to tweak and configure it can get a little bewildering. Under “IMAGE_MODE” for instance, you can choose seven different processing modes. The most relevant ones being “STANDARD”, “GAME_1” and “GAME_2”. We’ll discuss why later. As with the XRGB3, brightness is called “BLACK” and contrast is called “BRIGHTNESS” for some reason. You shouldn’t need to set black too high (no more than 2 or 3, it goes darker the higher it gets), if you do, you might mask some noise on the more noisy RGB outputs (my CD32 has a fairly noisy RGB output) but you’ll end up clipping detail too. Under the VISUAL_SET menu we can change the AUTO_SCALER scaling mode from “GAME” (adds a little artificial sharpness) to “VIDEO” (looks best for the Amiga’s Workbench OS for instance). Bizarrely, you can even turn auto scaler off and then adjust scaling parameters under “H_SCALER” and “V_SCALER” yourself. There’s so much here to tweak that perfectionists will find themselves fiddling with settings for hours.
Remember if you want smooth scrolling in PAL titles you will need to manually set the Mini’s output mode to a 50hz mode (under the HDMI_OUTPUT menu). Unlike some video processors there’s no auto switch/1:1 frame rate mode that can do this for you. Don’t forget to switch back to 60hz when you play NTSC content too!
For 288p (non interlace) games, you can use either “STANDARD”, “GAME_1” or “GAME_2” settings. You can add a little sharpness to the image (don’t turn it up above 2 at the very most though) or if you prefer, disable the auto scaler and play with the “H_SCALER” and “V_SCALER” options to sharpen the image. When it comes to interlace, “STANDARD” with “AUTO_SCALER” set to “VIDEO” and 720p or 1080p output gives a beautiful, flicker free interlace Workbench. By moving the Amiga’s mouse pointer you can actually see the deinterlacer working. You may notice how the edges of the pointer change as you move it, this is the type of effect that can happen to low resolution non-interlace content too on a standard HDTV. Of course, beautiful deinterlacing like this takes time, but by changing to “GAME_1” or “GAME_2” mode you get access to a deinterlacing mode rather like the XRGB3 did in its B1 mode. The dreaded flicker comes back (especially on the Amiga’s Workbench) but of course input lag times go right down. According to tests conducted with the Leo Bodnar input lag tester, there is no difference between the input lag on any of the Mini’s processing modes, so no reason to use the game mode deinterlacing whatsoever.
A note about scanlines – The XRGB Mini supports scanlines for all content, at least theoretically. In practise there’s still some bugs with the scanline engine. It works great for 240p (NTSC) material when the Mini’s output is set to 720p. It breaks if the Mini is set to 1080p output however. Currently, it’s also broken for 288p PAL material too, unless you set the mini to output at 576p/50hz. The XRGB3’s scanline engine works for 240p and 288p material just fine, but doesn’t work for 480i or 480p sources unless you add a SLG3000 to its output. At 576p/50hz output, interlace sources look pretty horrible on the Mini. In game it won’t matter but you certainly won’t want to use Workbench with this output mode.
With that in mind, it’s time to test some software. The Mini will be going up against the old champion, the DVDO Edge + XRGB3 combo. The DVDO Edge is a mid-range video processor designed for watching video content rather than gaming. For the year or so I’ve owned it I’ve come to appreciate what a good little processor it is, especially for the money (it’s big brother, the VP50, can set you back well over £2000/$3000). It has two deinterlacing modes, picture zoom and pan controls and a great little 1:1 frame rate option (meaning you don’t have to manually switch between NTSC and PAL like on the Mini). The DVDO Edge does support 240p and 288p content (though the new model, Edge Green, does not), but the picture is rather poor. By adding a XRGB3 to the DVDO Edge, you vastly improve the units handling of 240p/288p content as well as giving the option to add fake scanlines to said content. At a combined cost of around £800 for the two units, you might expect this setup to be perfect, but sadly the truth is there are several problems. Some systems just don’t work at all (RGB Modded PC Engine, Neo Geo) and others have issues with image warping (Sega Master System). How does the Mini fare when put against the previous 240p/288p champ? Let’s find out.
Test 1 – Menace (Psyclapse)
Psyclapse’s rather generic shooter features a fantastic sound track but rather bland gameplay. Still fun in short bursts, what it does feature is a scrolling demo mode and support for 60hz mode, making it an ideal candidate for testing smooth scrolling on the Mini. At 50hz the Mini is able to v-sync lock onto the Amiga’s signal perfectly and scrolling is absolutely 100% buttery smooth, a really great result. Go to 60hz however and things aren’t so great. Thanks to the PAL Amiga’s slightly out of spec 59.28Hz vertical refresh, many TV’s have trouble with stutter free scrolling on 60hz material. However, with the Mini the stuttering is absolutely minimal. I don’t know how Micomsoft have achieved this, but the stuttering is so minimal it’s hardly even noticeable. Compare that with the XRGB3 + DVDO Edge combo, in this setup the stuttering is terrible and is accompanied by white horizontal interference lines cutting across the screen (this happened on the Mini prior to firmware 1.07 too). A fantastic result for the Mini.
Test 2 – Fusion (Bullfrog Software)
Another game that’s not particularly fondly remembered. Fusion used the Amiga’s extra half-bright mode to produce drop-shadows under sprites. Since shadows often cause problems with upscalers this title was used to see if the Mini had any such issues. As expected the Mini was completely flawless once again with this PAL title. The XRGB3 + DVDO Edge combo was also flawless of course.
Test 3 – B.C. Kid (Hudson/Factor 5)
A rather nice conversion of the PC Engine ‘Bonk’ game for the Amiga. B.C. Kid features smooth scrolling and cartoony sprites, making it a good test subject. The game is supposed to feature a pseudo 60hz mode, but I could find no evidence of this when playing the game on my CD32. I did try forcing the game into 60hz but this just resulted in a black screen after the title screen, so this is a PAL only test again.
Once again, scrolling was absolutely 100% smooth even under close scrutiny. The scaling was of course lovely. Below you can see three screenshots of the game, one with the Mini and one with the XRGB3+DVDO combination, including emulated scanlines. The third picture is the XRGB Mini set to 576p/50hz output, the only way to get scanlines on 288p content.

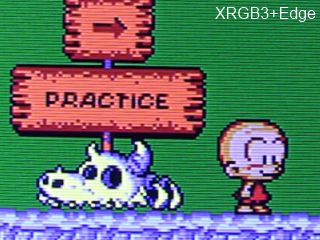
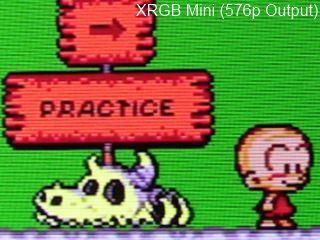
Like a lot of PAL games, B.C Kid doesn’t fill the entire screen, even on a low-res monitor. The Mini includes pan and zoom functions in its menus but they are extremely fiddly to use. There’s no option to zoom the picture evenly without losing aspect ratio, and every time the picture is zoomed even by one increment, the screen will blank for a half second or so. Zooming also breaks the scanline emulation. With the Mini in 576p output mode, using the zoom function can even completely crash the unit until a settings reset is performed. For zooming and centring the picture the DVDO Edge + XRGB3 combo easily beats the Mini. You can even add an Extron RGB interface to the XRGB3’s output to allow for even more flexible picture centring controls.
Test 4 – Pinball Illusions (Digital Illusions)
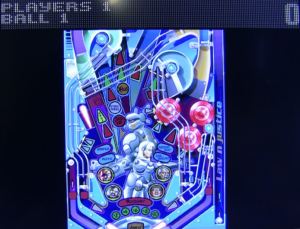
Popular pinball simulator Pinball Illusions is one of the few games to take advantage of the Amiga’s interlace screen modes. When multi-ball is activated, the screen changes modes into interlace in order to show more of the table at once. Because of this it’s a good game for testing the Mini’s handling of interlace and non-interlace content, as well as switching between them. The good news is that the Mini handles the scrolling in both interlace and progressive screen modes without a hitch, completely smooth scrolling all round. There did seem to be a slight hint of shimmer on the graphics as they scrolled in 720p or 1080p output mode, nothing like a stutter effect just something I couldn’t notice on the XRGB3.
Playing Pinball Illusions does highlight one significant weakness of the Mini however. If you trigger the multi-ball feature while playing, the game will switch automatically into interlace mode. For some reason the Mini is extremely slow when it comes to switching between different screen modes. This is a problem with most upscalers, but on the XRGB3+DVDO Edge combination the switch takes a second or two, quick enough so that the game is still playable. On the Mini, the switch is more like 5 seconds or more. Even worse, if you’re using 576p/50hz mode in order to get scanlines, the Mini will completely freak out when the screen changes to interlace and won’t settle down again until you manually adjust the V_POS setting for the screen.
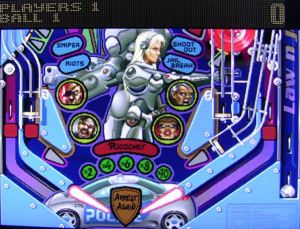
Below there are some screenshots showing the Mini handling the game in various modes. The first is the game in 288p mode with the Mini set to 1080p output. The second is the game in high res interlace mode with the Mini again on 1080p output mode. Finally the third shot shows the Mini set to 576p/50 output mode and scanlines added. It’s hard to see the scanlines on a digital camera shot, I apologise for this and if I get a capture card that can work with the Mini at any time I’ll re-take the screen shots. (click the images for bigger versions):-
C64 Tests
The C64 was my first computer. The family had an Acorn Electron prior to this (which my dad bought with the expectation of being able to run a lot of BBC Micro educational software), but the C64 was the first machine I could call my own. Unfortunately a lot of my C64 gear is in mothballs, but I was able to find a selection of software to test. The test machine is actually a Commodore 128D, a fully C64 compatible desktop computer. The 128D is known for having quite a noisy S-Video output (RGB is not available at all). With the XRGB3 I have tried transcoding the S-Video to RGB but the resulting picture left a lot to be desired. It had extreme jailbars and suffered from picture drop-out. I was delighted to find on the Mini, then, that not only was the picture 100% stable, but that the jailbar effect was absolutely minimal.
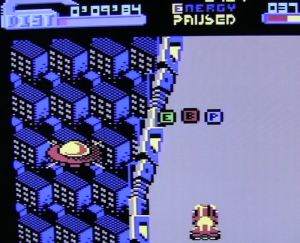
At 720p or 1080p output, the PAL C64’s scaling was slightly off. At first I thought my memory was rusty, but looking at the screen-shot below, the car in LED Storm just seems too squashed (click the picture for a bigger size).
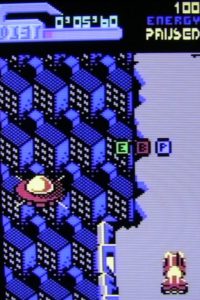
Switching over to 576p output however, and suddenly things look a lot better, scanlines work too (click the picture to get a bigger view):-
A very pleasing result. Since most C64 content has those huge borders around it, you can use the Letterbox modes on the Mini to zoom the image in or, if your TV supports it, using the Zoom function on the TV may give better results (thanks to Fudoh for this tip!). At 576p output the C64 looks absolutely lovely. I tested LED Storm, Thing on a Spring and Alien Syndrome and I can confirm the scrolling is 100% absolutely buttery smooth and stutter free! That’s better than most C64 emulators can manage.
Other PAL systems
Since there’s not so much call for good PAL handing on most other systems (who want’s to play PAL when NTSC versions are available right?) I only did a quick check of the PAL handling on my various other retro consoles:-
Atari Jaguar, Sega Megadrive, Sega Saturn – Flawless stutter free scrolling at 240p or 288p. Tested using the 240p test suite on the Megadrive, Cotton 2 and Radiant Silvergun on the Saturn and Cybermorph and Tempest 2000 on the Jaguar.
Super Famicom – Strangely there was a hint of stuttering on this system when set to PAL. Of course this is a NTSC system forced into PAL mode which could be the cause of the problem, but it was totally stutter free when using the XRGB3+DVDO Edge combo. There was no stuttering whatsoever at 60hz.
A note on input lag
Now that we have the Leo Bodnar display lag tester we can accurately test the input lag added by video processors. Sadly we have to report that the input lag added by the XRGB Mini is rather high, at around 20ms. this is significantly more than the XRGB3 in B1 (line doubling) mode or the DVDO Edge*, but better than the XRGB3 in B0 mode. If your TV is already pretty high input lag, adding the Mini could be a deal breaker. Of course, adding the Mini can sometimes decrease input lag when playing 240p or 288p games, since virtually all HDTVs treat 240p as 480i and apply deinterlacing. Newer sets have increasingly sophisticated deinterlacing which adds more and more frames of lag to interlaced inputs.
*Regarding the DVDO Edge’s input lag. The Edge has a curious bug that affects a small number of systems (so far we’ve found it affects the NTSC Sega Saturn, N64 and PC Engine). When these systems are attached, the Edge has 25ms of input lag, instead of the amazing 6ms we usually get. This appears to be a bug ABT introduced at some point and never fixed. The iScan VP30 is confirmed NOT to be affected by this bug.
Conclusions
The Mini really is quite an achievement and Micomsoft should be proud of the unit they have delivered. Over time it will only get better, as Micomsoft’s engineers continue to bring out firmware updates. CRT certainly isn’t dead yet (especially considering you can buy a second hand CRT for pocket change these days) but with the Mini, it’s taken another step towards the grave. Lets sum up how the Mini compares to the DVDO+XRGB3 combo, as well as the DVDO Edge on it’s own.
288p PAL RGB content (such as from an Amiga or PAL console)
Winner – DVDO Edge + XRGB3 (Scanlines + flexible zoom and pan options win here)
2nd Place – XRGB Mini (Scanlines only at 576p/50 output, but still very nice picture)
Loser – DVDO Edge (288p signal properly handled, but rather too soft and too much ringing on the image)
288p PAL S-Video content (such as C64)
Winner – XRGB Mini (when you figure out the correct settings, looks lovely)
2nd Place – DVDO Edge (288p signal properly handled, but rather too soft and too much ringing on the image)
Loser – DVDO Edge + XRGB3 (No better than DVDO Edge on it’s own, since the XRGB3 does not support PAL S-Video at all)
240p NTSC content (Either true NTSC content or 60hz PAL/fake NTSC, RGB or S-Video)
Winner – XRGB Mini (Pretty much perfect upscaling with scanlines if desired, far less prone to stuttering)
2nd Place – DVDO Edge + XRGB3 (Again perfect upscaling with scanlines, more prone to stuttering or even the dreaded white streak on troublesome systems though)
Loser – DVDO Edge (240p signal properly handled, but rather too soft and too much ringing on the image, no scanlines of course)
480i or 576i content
Winner – XRGB Mini (Choice of deinterlacing modes, sharp upscaling)
2nd place – XRGB3 + DVDO Edge combo (2nd place by a whisker, choice of 3 deinterlacing modes, XRGB3 deinterlacing is very fast, Edge’s deinterlacing is lovely but some might prefer the Mini’s sharper scaling for 480i video games)
3rd Place – DVDO Edge (lovely deinterlacing, without the XRGB3 there’s still a fast game mode deinterlacer in the Edge’s repertoire so you’re not losing much)
Mixed content (Games which switch between interlace and progressive)
Winner – XRGB3 + DVDO Edge (Wonderful sharp scaling, changing between interlace and progressive takes 2 to 3 seconds)
2nd Place – DVDO Edge (Rather poor 240p/288p handling, but changing between modes is fast)
Loser – XRGB Mini (Really too slow/buggy when changing modes to be useful)
Compatibility
Winner – XRGB Mini (Compatible with everything I’ve tried, only N64 caused problems and that was fixed using a different cable)
2nd Place – DVDO Edge (Struggles with out-of-spec systems like a PAL Amiga set to 60hz/NTSC)
Loser – DVDO Edge + XRGB3 (Far too many problems, PC Engine never worked for me, Sega Master System and Neo Geo also often problematic)
Input lag
Joint winner – DVDO Edge, with or without XRGB3 (XRGB3 adds virtually no input lag whatsoever in B1 mode, some systems increase lag to 25ms however, in this case the Mini wins).
Loser – XRGB Mini – Input lag measured at 18 to 22ms (Tolerable in many games, but disappointing for a game-centric video processor. Remember you have to add your displays input lag times on top of what the mini is already doing).
Value for money
Winner – XRGB Mini (Less inputs than the others, but most compatible and flexible)
2nd place – DVDO Edge (If you want an upscaler for video rather than videogames primarily, then this gets 1st place)
3rd place – XRGB3 + DVDO Edge (Two expensive boxes just to get as good a picture as a CRT? Please!!)
If you’re just building your retro gaming setup I really wouldn’t bother with an XRGB3 now. Yes there are still situations where it is better, but as the Mini is still actively developed it’s a far better bet at the moment. If you want a general purpose video processor the DVDO Edge is still recommended. You could even feed the Mini through the Edge and use the Edge’s more flexible zooming and panning controls, although the Edge will add a minimum of 6ms to your input lag times. If you absolutely must have the best setup, especially in light of the rather high input lag times on the XRGB Mini, there is some justification for having the XRGB3, DVDO Edge and the XRGB Mini, however its a lot of money and cable clutter to invest in. Having said that, I have been really impressed with the Mini but I’m still not taking my XRGB3 out of my setup just yet. XRGB3 + DVDO Edge combo is still the king of processing 288p RGB PAL material, but only just. Don’t forget of course that if you have the space, it’s going to be cheaper and easier just to have a separate CRT for your retro consoles.
Back from XRGB Mini Review to Home Page



Hey,
First of all, super great post!
Secondly, wondering if you could help me out, what kind of RGB cable did you use with your CD32? I’ve got a couple of old 2 ones that I’ve used with my CDTV and various Amigas in the past, but they are lacking components such as Capacitors and Resistors which might be needed for any kind of attenuation for the safety of not damaging the Framemeister? They are all straight wires as said, nothing else in neither the Scart head nor the 21-Pin head.
I’m also using the TerribleFire 328 Expansion with the 23-Pin RGB connector. I believe It’s just passing through the RGB signal without any modification to the signal such as attenuation to 75ohm.
I’ve found a couple of schematics with similar but still different values, one has a 75 Ohms resistor on CSYNC and the other 330Ohms.
Anyways, thanks for reading and I would appreciate any input you or anyone else reading might have for getting the best cable for my CD32 with TerribleFire 328 and Framemeister.
Yeah I need a better SCART cable for my CD32 too.
Great post guys, I am finally looking at getting a Frameeister Mini as part of my setup at home. Any questions that I had with regards to setup / config are pretty much ironed out now, I just need to find the most reliable / cheapest retailer to acquire one and get it to the UK. So far Solaris seems to be the best option that I have found so far, any other suggestions?
Wait for the OSSC? 🙂 I got my Mini from Solaris, very good customer service.
I see, so the SLG is useless if I buy the framemeister, right?
Depends what you’re trying to do I suppose!
Hi
Is it possible to use the Framemesiter with the SLG3000 for scanlines?
Thanks in advance
The Framemeister already has scanlines. If you limited the output to 480p You could use a HD Fury + a SLG3000 yeah, its a lot of hoops to jump through though.