SNES Mini w/ Dejitter Mod
NewHome › Forums › OSSC, OSSC Pro and DExx-vd isl › OSSC – Discussion and support › SNES Mini w/ Dejitter Mod
- This topic has 13 replies, 5 voices, and was last updated June 6, 2020 at 9:54 AM by
Deleted User.
-
AuthorPosts
-
June 11, 2018 at 9:54 PM #22099
Anonymous
I tried posting this at shmups, but my post requires admin approval and 24 hours later, hasn’t appeared on the NES/SNES 240P Dejitter mod thread. I’m probably being impatient, but thought this might also be useful here, and I know many of you frequent both forums.
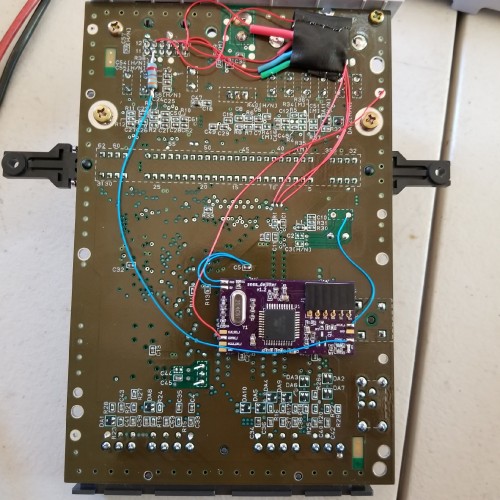
Completed the dejitter mod on my SNES mini (SNN-CPU-01) yesterday. Programmed the 1502AS with raspberry pi. Would like to share the openocd.conf file, as it should either be immediately compatible with any pi, or easily portable with a few minor tweaks. it contains plenty of context to help other users out quickly, if minor tweaks to the file are needed. And that was, for me at least, the most intensive piece of this project.
Now a few observations/questions:
1) My primary intent for doing this mod was to improve compatibility with elgato camlink capturing. My TCL tv works great in all modes from SNES/OSSC. The camlink, however, was previously stable only up to line3x. Line4x was shaky, and line5x was no go. Unfortunately, after the mod, line2x is the best I can get stably with the camlink. But that 2x, I believe, looks better than it did.
2) This reduced compatibility could possibly be the result of the SNES now spitting out >60hz sync. Across multiple boots, the OSSC report sync to be in the range of 60.05hz to 60.08hz.
3) I am also curious if there is a good reason to connect the dejitter mod board csync_i to S-GRB pin 7 as oppopsed to S-RGB pin 18? I previously had csync connected to pin 18. I tried both, and ended up leaving it at pin 18. When connected to pin 7, the camlink was having trouble identifying the resolution: line5x reported as 1920×2050, line4x reported as 720×480, line3x reported as 720×480.Now, I may be interested in undoing this mod, but had to remove C3 per the installation instructions and it has disappeared. Anybody know what the value of C3 is (or know where to find proper schematics for SNN-CPU-01)?
June 12, 2018 at 8:48 AM #221052) This reduced compatibility could possibly be the result of the SNES now spitting out >60hz sync. Across multiple boots, the OSSC report sync to be in the range of 60.05hz to 60.08hz.
I don’t think so, normal ntsc SNES (and NES) output was always over 60Hz (60.08-60.10), so your figures look completely normal. Crystals can drift over time, so lower refresh rate would not be uncommon at all.
June 12, 2018 at 2:59 PM #22114Good to know thanks for confirming that. Theres always so much more to be knowledgeable about…
I think I may have found another potential cause. For the mini, there is supposed to be a 330 ohm resistor on the sync line? I’ve got nothing on mine.June 12, 2018 at 8:25 PM #22116Before going further, you should check whether de-jitter functionality is operating correctly. Setting H-PLL pre and post values to 3 should still keep OSSC reliably synced unlike with vanilla console. You can also try repeatedly pressing INFO button of remote, after which the number on bottom right corner (more accurate calculation of refresh period than the Hz on main screen) of character LCD should vary no more than 1 tick between samples.
3) I am also curious if there is a good reason to connect the dejitter mod board csync_i to S-GRB pin 7 as oppopsed to S-RGB pin 18? I previously had csync connected to pin 18. I tried both, and ended up leaving it at pin 18. When connected to pin 7, the camlink was having trouble identifying the resolution: line5x reported as 1920×2050, line4x reported as 720×480, line3x reported as 720×480.
Pin 7 is CSYNC input from CPU which is buffered (causing a slight delay) to output pin 18. Both should work but I’d still recommend pin 7. Any discrepancy in functionality hints at a potential timing issue. In that case you should try earlier version of the SVF which has been verified to work with Mini (most recent one has only been tested with Famicom and SHVC-CPU-01 as far as I’m aware).
Good to know thanks for confirming that. Theres always so much more to be knowledgeable about…
I think I may have found another potential cause. For the mini, there is supposed to be a 330 ohm resistor on the sync line? I’ve got nothing on mine.It shouldn’t make a difference whether you have the resistor or not.
June 12, 2018 at 11:14 PM #22122Marqs, you are a genius! (not that I didn’t already know that) I fired things up, was mashing the info button, and it never changed from 60.08hz. I changed H-PLL Pre- and Post-Coast both to ‘3’. The TV stayed stable. I was about to report back and thought, “let me check the camlink”. Opened OBS, and it was rock solid. Thought “oh, I need to change the line mode.” Oh, no wait, no I don’t, it’s on line5x. 😀
Thank you thank you thank you!
Now, I didn’t change the connection to csync_i, and it is still on S-RGB pin 18. Would you recommended going ahead and changing that?
Also, for my own learning, can you explain why the H-PLL settings corrected this?
June 12, 2018 at 11:23 PM #22124Also, to document the svf version, if this information is at all helpful for documenting compatibility:
1) downloaded the pof from here on Sunday: https://github.com/marqs85/snes_dejitter/tree/master/output_files
2) Converted it with winpof2jed, on a winxp machine
3) Converted the jed file to svf with atmisp, on a win 10 64-bit machine
4) Flashed the atmisp output to 1502as with piI have parts for a couple more boards, I will try the newest svf file, just for posterity. Hoping to assemble those boards this weekend.
June 13, 2018 at 12:09 AM #22127Are you sure your cable is wired to csync pin? HPLL coast increase should only help if you tap sync from composite after the mod, since there you have a short scanline followed by a long scanline, and when you mask them with coast, they have the same effect as 2 normal scanlines. Using CSYNC_o, all scanlines should be the same length (in time domain) and it shouldn’t matter which coast settings you use.
June 13, 2018 at 1:53 AM #22128I’m sorry, I don’t completely follow what you’re saying.
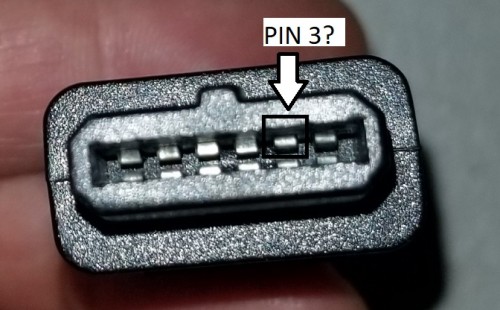
But, SCART pin 20 is continuous with console end pin 3. To make sure I’m not completely confused (wouldn’t be the first time…), below is the pin that I believe is pin 3, and is continuous to SCART pin 20. Internally, the dejitter board csync_o is connected to pin 3 at the multi out.
If you’re referring to the appearance of the scanlines in the video, if they do not appear perfectly uniform, that is more of a function of the camlink, OBS or something at the PC. On the TV, they are perfectly uniform, and the appearance of the image on the TV did not change in any way as I was changing the coast settings.
 June 13, 2018 at 2:07 AM #22130
:update: I understand what you’re saying – coast settings shouldn’t correct sync unless it’s composite sync?
I tested setting coast settings to various combinations. With both set to zero, the TV is fine, but the camlink is unstable. With post-coast set to ‘1’ (pre-coast set to ‘0’), the image was mostly stable but would cut out intermittently (pre-coast set to ‘0’). With post-coast set to ‘2’, the image is stable.
June 13, 2018 at 11:37 AM #22136You should have also tested continuity from the console pins so you would have seen that pin in the cable is actually pin 9 composite video.
If you do not want to use composite video anyway then you can remove the 75Ohm resistor on the SNES mainboard, verify there is no composite video output anymore and connect CSYNC_o with a 300-470Ohm resistor to pin 9. That way you can still use your composite video RGB cable.
June 13, 2018 at 3:28 PM #22139Right you are. Thank you for setting me straight. Going to try this modnto make pin 9 work for now. But, have also ordered a proper cable fron retrogsming cables. This is the last of my cables that hadn’t yet been replaced with a proper cable.
Thanks for all the help so far, fellas. Will report back tonight. And seems I need to take down that video with some erroneous assumptions.
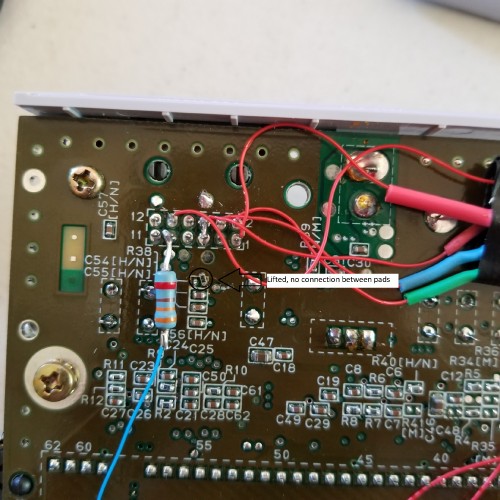
June 14, 2018 at 1:27 AM #22151Okay, re-routed csync_o to pin 9 (with 330 ohm resistor). Lifted the nearby 75ohm resistor, which prior to lifting it, tested continuous to pin 9.
elgato capturing is stable at all lines, and pre- and post-coast adjustments no longer have any effect.
I also re-located csync_i connection to S-RGB pin 7 per marqs’ recommendation. I didn’t notice any difference between the two, but if marqs recommends it, I do it. 🙂
Have I done anything else foolish or uninformed? Please don’t critique the assembly work too much. I’ve done quite a few QFP’s but not many SMD resistors and capacitors prior to this. 🙂
And a quick video capture @ line4x, 8:7 ratio:
June 24, 2018 at 7:37 PM #22244Just wanted to circle back on this, to provide some updates. Got my legit csync cable from retrogamingcables, and moved csync_o back to pin 3. This SNES is now looking and capturing as gloriously as ever.
I also wanted to provide the pre-configured pi image, in case anyone would find it useful for their dejitter board assembly/programming project.
Tested on Pi 1 Model B+, Pi 2, Pi 3 Model B; and snes_dejiter v1.2. The complete assembled and programmed dejitter board tested on SNES Mini (SNN-CPU-01).
Download pi image here: https://drive.google.com/open?id=1iy0jj0sSLmQe0vSsW8BpHByIsduTYyF9
There is a gui version and a non-gui version. The non-gui version may fit on a 2GB SD card, but I would go with a 4GB minimum, for either image, to be safe.
Connect 5V and ground from GPIO header to dejitter board JTAG connector before power on pi. Hot-plugging the JTAG signal lines is no problem, but hot-plugging 5V may cause a voltage error, requiring the pi to rebooted.
Login: pi
Password: raspberryAs far as I can tell, GPIO implementation on the Pi has not changed over the various model revisions, with the exception of the base address being different on Pi 3, compared to its predecessors. /home/pi/openocd-pi.conf contains instructions for changing the base address within the file, to ensure compatibility. Openocd-pi.conf contains much useful information, including GPIO header pin assignments, for connecting to dejitter board for programming:
>sudo nano /home/pi/openocd-pi.confOnce you have read through openocd-pi.conf and done any initial testing, connect dejitter board to GPIO header/pi, and run the following commands:
> cd /home/pi
> sudo openocd –f openocd-pi.confThen proceed with the following instructions from marqs’ readme:
https://github.com/marqs85/snes_dejitter/blob/master/README.md
3. OpenOCD auto-probing should report a TAP controller with id 0x0150203f. You can now open another terminal to interact with openocd and program the chip:
telnet localhost 4444
> svf /home/pi/snes_dejitter.svf
4. The programming procedure should finish with no error, after which you can finish installation by powering off hardware and disconnecting the programmer./home/pi also contains snes_dejitter_new.svf, which is the latest svf version contained at the project github page. Programming with this svf was not successful for me, and I suggest ignoring this svf file, but it is there for posterity.
:edit: The uploaded image and dejitter board programming has now been tested successfully with a Pi (1) Model B+ and Pi 3 Model B (gpio base address has to be changed in /home/pi/openocd-pi.conf; notes are included within openocd-pi.conf, if you open it in a text editor).
June 6, 2020 at 9:54 AM #38650Thanks for the observations on this page. I ended up using the information to output DeJittered csync to pins 3 and 9 both (by bridging with an additional resistor to pin 9) in order to be able to use SNES NTSC csync type scart cables and the universal Nintendo cable by RGC. The latter provides sync by way of the composite signal – through the use of a sync stripper I believe. Either way, both work now, and I’ll be testing if there’s any disadvantage to this solution besides having sacrificed the composite video output 🙂
-
AuthorPosts
- You must be logged in to reply to this topic.