AV Guides, Howto & Guides
PEXHDCAP Tutorial 1 – Getting started
The PEXHDCAP capture card is all the rage amongst gamers at the moment. If you’ve still not heard about the card and what it can do, you might want to head on over to our PEXHDCAP review. I’ve also put several video tutorials on my Youtube channel that you can view here.
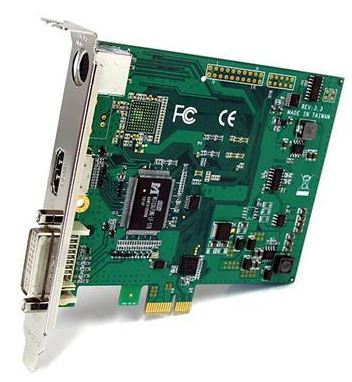
To use the PEXHDCAP capture card, you will need a PC with 1 free PCI-Express x1 slot. You will also need driver software and a capture program, but more on that later. Before you start, you might want to consider how to connect all your systems to the card. Let’s take a look at the card and its available inputs:-
At the very top of the card, the mini-din connector accepts component (YPbPr) and analogue audio. There’s only one set of analogue audio connectors that serve both the component input and the DVI-I input where you feed in VGA and RGB signals. The HDMI connector accepts HDMI as long as the signal is HDCP free. You can also transmit audio along with your HDMI video but the signal must be digital stereo, sending anything else (e.g Dolby Pro Logic) will either produce a horrible noise or simply silence.
The first thing you should decide before going out and buying any cables or switching hardware is how you are going to integrate the capture card into your system. Do you intend to play on the monitor while you record or would you rather use your regular TV to game on while your PC records separately. For those on a tighter budget, playing and recording on the PC is quite possible. With the Micomsoft developed capture software, the input lag is around 17 milliseconds, fast enough when coupled with a low-lag monitor. If you want to play on your TV and record separately, you will need some kind of signal splitter. Buying splitters for all your consoles could get expensive, so plan carefully before spending any money. Let’s consider how to connect various consoles to the unit.
Xbox 360 – The Xbox 360 doesn’t output HDCP copy protection during gameplay, leaving you free to capture your play sessions. Of course, you will need to set the console to 720p output. HDMI splitters are readily available and can split the signal from your 360 between your TV and the capture card. I personally have been using the Cablesson models available on Amazon.co.uk here. Remember that the capture card cannot handle Dolby Digital audio, which means you need to play in stereo only, or use some kind of dolby decoder. The 360 outputs optical audio and HDMI embedded audio at the same time, meaning you could feed the optical audio into a converter box. Be careful when choosing a digital to analogue audio converter however, since many only support digital stereo anyway.
Playstation 3 – The Playstation 3 sadly enables HDCP copy protection even when playing games, meaning that if you try to capture directly from the HDMI output of the console you will be in for a disappointment. What is needed is some way of stripping away the HDCP. There are various means of doing this, sadly copyright laws in many countries prevent the sale of HDCP stripping devices. One way is to use a HD-Fury device, though these can be rather expensive.
Wii, Xbox 1, Gamecube and other component video sources – There are actually several component video switches that provide multiple inputs and two identical outputs. The CablesToGo 89015 for instance, has 6 inputs and 2 identical outputs, allowing you to connect both to the capture card and the TV.
Dreamcast – Since the PEXHDCAP can handle both 15khz and 31khz RGB, the modified Dreamcast VGA box is an ideal match for this instance. If you plan to use a VGA splitter, remember that some of them don’t handle interlace signals, fortunately as far as I am aware, the vast majority of interlace titles also have the option of outputting VGA.
RGB SCART consoles – To connect RGB SCART devices to the capture card, you will need some kind of sync splitter and stripper. You can capture directly from a video processor, such as the XRGB3, if you want to. Alternatively, use ArcadeForge’s Sync Strike to connect RGB consoles directly to the card.
If you need to split your SCART signals there are several options. Switches like the Shinybow 6:2 offer two identical outputs with six inputs. Then there’s the SCAMP-2 SCART splitter and the Keene 1:5 SCART distribution amplifier that we discuss over on our SCART switch roundup page.
S-Video and Composite sources – These cannot connect to the card directly. There are several options for converting them into a format that is compatible. You could feed them into a video processor like the XRGB Mini, which will convert composite or S-video into HDMI. You could by a cheap composite or S-Video to RGB transcoder and then feed them in via the Sync Strike. Picture quality will of course vary depending on the equipment you use. S-Video sources can look close to RGB when processed correctly, composite usually looks pretty bad no matter what you do to it.
Hooking everything up
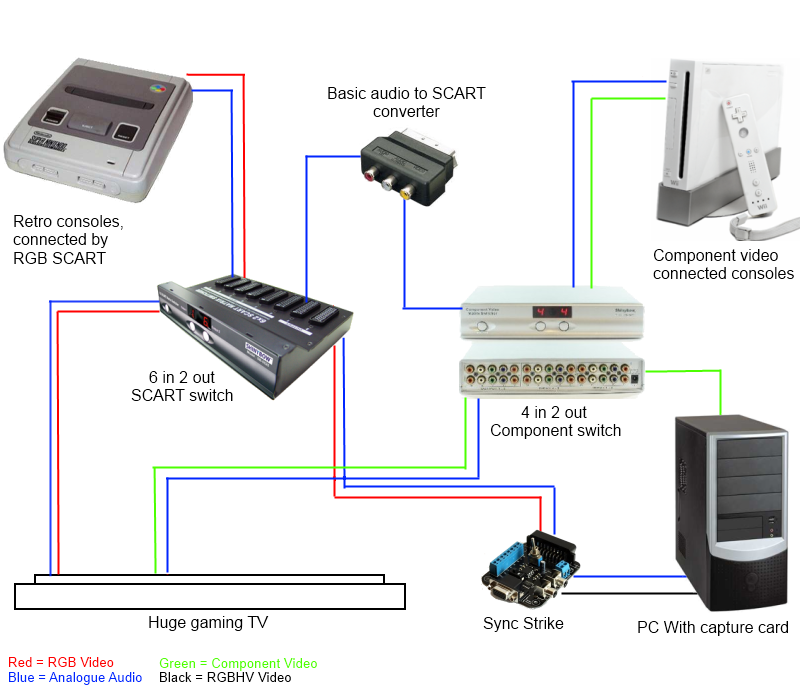
When planning a switching setup, remember that the component video and the RGB inputs must share the same set of analogue audio inputs on the capture card. You might need to keep a spare socket on your SCART switch just to route through audio from the component switch. With that in mind, it’s time for one of my fantastically well drawn diagrams! Below is an example of how you could connect RGB and YPbPr equipment and split out the connection between the capture card and your display.

Click the diagram to get a bigger view. The diagram might look complicated at first glance, but it’s not really that complex. There’s basically two switches, one for component video and one for SCART. Both the switches are providing 2 outputs. On the SCART switch, one output goes to the TV (or whatever video processor you’re using for your 240p stuff), the other goes to the sync strike to be converted into a format that the capture card can understand. The component switch splits component between the TV and the PC, except one of the audio outputs is routed first to the SCART switch. This is because the analogue audio from SCART and component needs to be combined down one wire to the capture card.
Choosing drivers
There are two sets of drivers you can use with the card, each set of drivers also comes with its own capture software too. The Micomsoft drivers can be downloaded here. The page is in Japanese, but you should be able to guess your way to the correct download (hover your mouse over a link to get a little hint). The StarTech drivers can be obtained here. You can switch between the drivers at any time simply by installing another set, though any settings you configure for the card will be reset at this point. The drivers produce slightly different results when capturing, but the StarTech drivers allow brightness and contrast to be tweaked and so are recommended over the Micomsoft ones. The Micomsoft drivers do have one important advantage however. When using the VideoKeeper capture program with the StarTech drivers, there is no sound when previewing the capture. Sound is recorded just fine, but you won’t hear it until you play the video back.
With the StarTech drivers you will get a program called StreamCatcher, while the Micomsoft drivers come with a program called VideoKeeper. For even more control over your captures, you might want to download AmaRec TV too. In the next tutorial we will take a more in-depth look at choosing capture software and make our first captures.
Back from PEXHDCAP Tutorial 1 to Home Page


What kind of breakout cable you actually need for connecting audio to PEXHDCAP? I’m using Sync Strike after Super Famicom in RGB and I tried using composite + stereo audio RCA to 7-pin miniDIN from Sync Strike but got no audio in PEXHDCAP. I can’t find any component + audio breakout cables online either and am quite puzzled.
You can’t use the SLG3000 to add scanlines to a 15khz source, no. SLG3000 only works with 480p sources.
Since both the Sync Strike and the SLG3000 are VGA, is it possible to daisy chain them together? Console RGB coming out of an SC-AMP2 -> SLG3000 -> sync strike -> PEXHDCAP in the PC? If I chain it like this, can I still maintain audio without any extra steps?
***EDIT***
Just realized my own goof in the “chain of command.” Here’s what I picture:
Console –> RGB SCART Out –> SC-AMP2 –> Sync Strike –> audio and video signals continue separately. To clarify, the other output on the SC-AMP2 goes to an RGB monitor, so that it actually has a reason to be in this equation 😀
Audio: Sync Strike –> RCA audio out –> breakaway cable –> PEXHDCAP
Video: Sync Strike –> VGA out –> SLG3000 –> VGA out –> PEXHDCAP via vga/dvi-i adapter.
Don’t actually own the Shinybow, it’s just one particular switch that’s readily available. Others over on Shmups forum have vouched for its quality though. Your other option is something like the SC-AMP2 splitter.
Did you take some screenshots with and without the Shinybow splitter for comparison? I’m thinking about getting one after the Marmitek failed so hard.