AV Guides, Howto & Guides
PEXHDCAP Tutorial 3 – Codecs in AmaRec
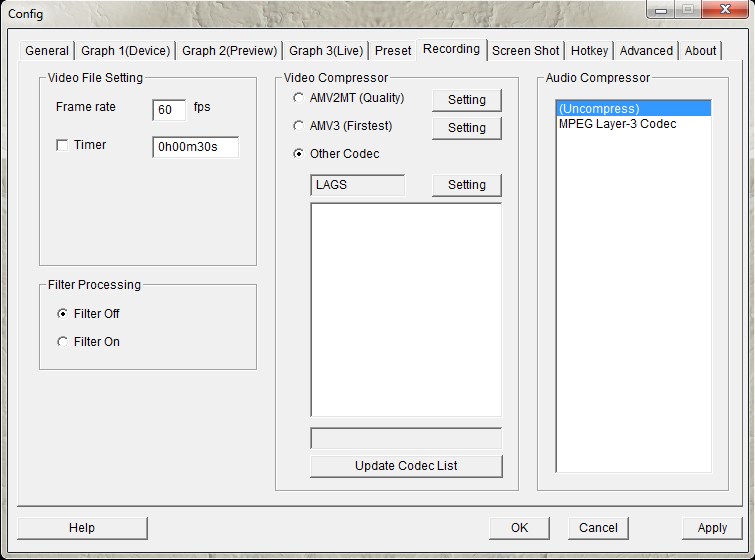
With basic capture sorted out, you can now proceed to tweak the results you get from the capture card by using different codecs for recording. Codecs are pieces of software that can both encode and decode video. Compressing video is a complex subject and there are many different video codecs, each with their own advantages and disadvantages. With VideoKeeper you only have the choice of the x264 encoding built into that program. AmaRec on the other hand lets you choose any codec that you have installed on your PC. To change codecs, go to the Recording tab on AmaRec config window:-
Selecting codecs is done in the middle of the window, under “Video Compressor”. AmaRec has built in support for the AMV2MT and AMV3 codec. You can select those by choosing the AMV2MT (Quality) or AMV3 (Firstest) presets. In all likelihood “Firstest” should actually read “Fastest”. The AMV codecs are fine for when you are just learning how to use the program, but since they are not free, any capture you make with them will have a large watermark on it, unless you cough up the registration fee. The fee is $10 dollars and while the AMV codecs are good, there are several free alternatives that perform just as well for video game capture, so we won’t go into configuring AMV codecs in this tutorial.
Lossless Vs Lossy codecs
When researching which codec to use, you will see the terms “Lossy” and “Lossless” used often. This refers to the kinds of compression that the video codecs use. Lossy compression loses some of the quality from the original capture. By reducing the quality you save disk space, often a lot of disk space can be saved for only a minimal loss of quality. Nevertheless a lossless capture can be desirable. If you plan to edit the video later, perhaps to add titles, convert it to a DVD or Youtube movie or for whatever reason, then each time you re-encode the movie using a lossy codec you will lose some more quality. For this reason it’s desirable to work and edit the best quality capture possible, before re-encoding the movie later. To distribute your movie, you are realistically going to need to encode or re-encode it into a lossy format at some point and sites like Youtube will automatically re-encode videos you upload anyway.
To configure a new codec, install it and then start or restart AmaRec. Go to the Recording tab and click on “Update Codec List”. You should now see your new codec in the list (if it is compatible). Click on it and then click “Setting”. Below is a brief look at three popular choices of codec.
FFDShow – FFDShow is a multi-purpose media encoder and decoder that can use several different formats, both lossy and lossless. FFDShow encoded files have wide compatibility. For instance they can import into software such as PowerDirector, where media encoded with codecs like Lagarith will fail. On the configuration window for FFDShow you can choose between several encoders. MJPEG and DV are lossy codecs, while HuffYUV and FFV1 are lossless.
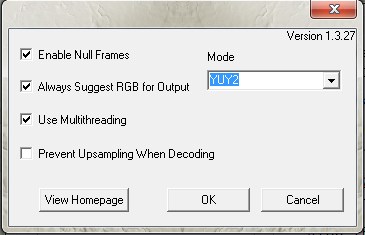
Lagarith – This is a lossless codec that has very good (for lossless) compression rates and works really well with the StarTech capture card and AmaRec. The Lagarith configuration window offers only a few options as shown below:-
For best performance, make sure “Enable Null Frames” and “Use Multithreading” are enabled. Mode can be set to YUY2 as this is the mode the capture card works with. All the other options can usually be left as the defaults.
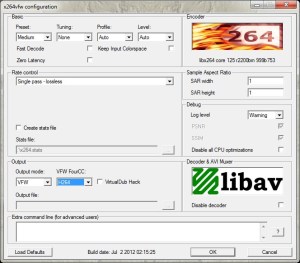
X264vfw – The Windows version of the popular X264 codec, as used in VideoKeeper captures. The codec has both lossless and lossy modes. A picture of the codec’s configuration window is shown below:-
Click on the picture to see a bigger version. Under “Rate control” you can choose between lossless and lossy modes. When you choose a lossy compression you will get access to all kinds of configuration parameters that let you tweak the level of compression applied. Consult the documentation and experiment to find what gives the best trade off between file size and quality for you. Most of the other options can be left as default. Remember to select the “VirtualDub Hack” option if you intend to edit your x264 files in VirtualDub later.
Lossless x264 captures tend to be a fraction larger than those done with Lagarith, but the x264 format is more widely compatible and can even be directly uploaded to Youtube if desired.
That concludes this brief tour of recording using video codecs. Hopefully now you have enough information to get started with AmaRec and experimenting with the various recording options. As always, there are plenty of resources on the web for each codec to help you find the best settings for your setup.
Back from Startech PEXHDCAP Tutorial 3 to Home Page


