 Before PC came to mean a black or beige box running either Windows or Linux, the personal computer market was much more colourful. In the 80s and early 90s the affordable computers of choice in the UK were made by Amstrad, Spectrum and Commodore. My allegiance was always to Commodore, first with their C64 and later with the Amiga. While the C64 always seemed to be the best 8 bit micro in my eyes, the machine isn’t without its disadvantages compared to the machines produced by its UK based rivals. Most notably, the machine not only lacks RGB output but lacks any kind of capability for RGB to be added with an after-market modification. At least the machine offers S-Video, which would be acceptable if the picture quality wasn’t completely awful and barely a step above composite on most displays.
Enter LumaFix
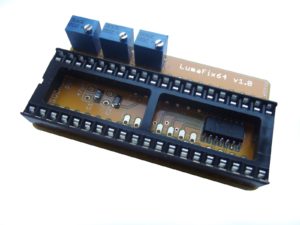
While we have to live without RGB on our C64, we can now at least take some steps to improve S-Video quality thanks to the LumaFix 64 board. We ordered our LumaFix from Shareware Plus and it arrived promptly a couple of days later. The board itself is pictured above on the right (or at the top of the article if you’re reading on a phone). This modest looking board was made “to easily remove vertical lines from your C64 image caused by signals also in the VIC-II video chip”. The LumaFix consists of a socket and three small blue blocks with screw terminals on top. Underneath the board there’s a set of pins that match the socket on top. To install the unit, you need to dismantle your C64 and gently prise off the VIC-II chip from its socket. Then, seat the LumaFix 64 into the socket (make sure to check the alignment first, the notch on the LumaFix socket should match the notch on the C64’s socket). To fit the LumaFix in securely requires quite a bit of pressure, so be careful not to flex your C64’s motherboard too much. Once the board is in place, check that it’s fully mated with the socket before fitting the VIC-II chip onto the LumaFix itself. Again, make sure you check the alignment when installing the VIC chip.
A small number of C64 motherboards may not have socketed VIC-II chips, in which case you will require some soldering skills to fit the upgrade (or you can contact us to arrange a fitting). A small number of ‘long motherboard’ C64C machines may also be incompatible due to a lack of space, but most C64s should be fine. Note that the Commodore 128 is NOT compatible with the LumaFix.
At this point you will need to power on your C64 again, all cables attached, but without actually closing it up. What you need to do is adjust the three screws on the LumaFix until you achieve the best picture. On our C64 when we first powered back on I was convinced I must have damaged the VIC-II chip, the picture was so bad. However, it turns out that it simply needed extensive tweaking. It’s basically a question of keep turning the screws until the best picture is achieved. Be careful and try not to slip with your screwdriver as you adjust. It’s easily done, since you tend to be watching the screen, not your hand. If you do slip, chances are you will simply crash the C64 rather than cause any lasting damage (at least that’s what happened in our case).
As well as working on the iconic blue Commodore Basic screen, you might want to try loading a more colourful picture too, just to be sure you got everything as optimal as possible before reassembling your classic Commodore. Shareware Plus recommend using an unmodified S-Video cable with the LumaFix, that means one without the additional resistor that many assemblers add to the chroma line. If you’re buying a cable specially for use with your Lumafixed C64, check with your dealer to make sure this component isn’t added.
Illuminating results
So, how does the LumaFix perform? Well, the picture quality is significantly and appreciably improved. However, it’s fair to say this little device can’t fix everything wrong with the VIC-II chip. It almost feels unfair to mark the LumaFix down for this, it does a pretty excellent job at improving things but it must be said the picture is still some way off the perfect, clean S-Video you might expect from a Super Nintendo Mini, for instance.
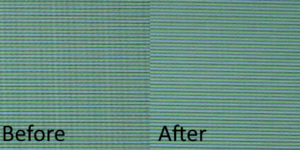
Take a look at the image below which shows a before and after shot (taken using a digital camera). You can clearly see the improvement LumaFix makes to the image. The image was taken from a C64 using a Sony transcoder connected to an OSSC. Scanlines were turned on.
With the image on the left, the C64s interference makes a kind of cross hatch pattern that looks really bad when used with the OSSCs scanlines. On the right, things look a lot cleaner as you can see. The image still has some colour bleeding but the improvement is obvious.
Overall then, we have no hesitation recommending the LumaFix. For the paltry sum of just £12.50, the little board makes such a big difference to your C64 that you’d be crazy not to get one.
The LumaFix 64 is available directly from SharewarePlus. Visit their eBay store or contact them directly via e-mail at sales(at)sharewareplus.com.
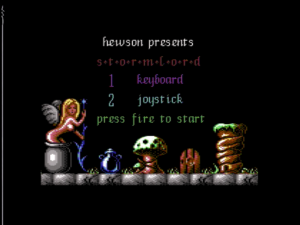
Below are a couple of screenshots we took with the LumaFix enabled C64 attached to our Sony YR-3000 transcoder and then fed directly into the Startech PEXHDCAP capture card. As you can see the picture is pretty good, but there are still some lines in it as you can see on the Exploding Fist picture (these are not badly artificially generated scanlines). The OSSCs scanline feature helps to hide these artefacts but we couldn’t eliminate them entirely. The screen warping effect at the top of the image is not a side effect of the LumaFix and does not appear when we connect the C64 to either the OSSC or the XRGB Mini. Click on any picture to enlarge it.


