Optical media, with its megabytes of cheap storage space, may have helped propel the Sony PlayStation to market dominance over the Nintendo 64, but for collectors and retro gamers it has now become more of a curse than a blessing. The moving parts in retro console CD/DVD drives are starting to wear out and the media itself has proven to be much more vulnerable to degradation than was previously thought. Lucky for us, the retro gaming communities are full of amazing hardware engineers, ready to solve problems like this. Back in 2016 we reviewed the Dreamcast GDEMU device, a piece of hardware that allowed for the loading and running of Dremcast games from SD memory cards. Now, thanks to the efforts of Russian based 3do-renovation, it’s possible to replace your Dreamcast’s aging GD-ROM drive with a device that will read disc images from USB instead, introducing the USB-GDROM.
Bye bye GD-ROM
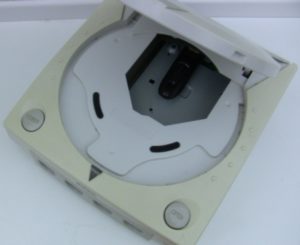
The USB-GDROM acts as a complete replacement for your Dreamcast consoles GD-ROM drive. As you might expect, once you fit the device it’s no longer possible to load Dreamcast software from optical media, since the drive is completely replaced. You might be expecting a device like this to require extensive hardware modifications to your classic Dreamcast console, however that is not the case. Once you obtain the USB-GDROM device, it’s simply a matter of opening your Dreamcast and removing the GD-ROM mechanism and controller board and replacing it with the USB-GDROM. No soldering is required, and the USB-GDROM has been designed to fit in the existing mounting plate perfectly. There are several tutorials on the internet on how to fit the device, but really it’s very difficult to go wrong.
The only step that does require soldering is an optional one. It’s possible to remove the Dreamcast’s door switch from the existing GD-ROM controller board and re-solder it to the USB-GDROM board. By doing this, you can simulate a disc change by opening and closing the Dreamcast’s drive door. Since only a handful of Dreamcast games came on multiple discs (and many of those that did do not require the discs to be swapped mid-game) this step is completely optional. Of course, we can help with this mod if you have a Dreamcast USB-GDROM you want to install, simply send us a message.
Preparing your USB device
To use the USB-GDROM you will need, unsurprisingly, a suitable USB storage device. For most folks, that will be a USB stick, though it’s possible to use hard drives too (of course, some hard drives may require external power). For best results, you need to format the USB stick or hard drive to FAT32 with a cluster size of 64kb. If you get the cluster size wrong, you may notice glitches in games that use CD audio, so make sure you get this right. If you have issues formatting your USB stick, you can use the formatting tool available here. Once the stick is formatted (a fast format will do) you simply need to copy over your Dreamcast disc image files. Strictly speaking you’re only legally allowed to use disc images of Dreamcast games that you own, so we’ll just assume you’ve got your own rips of your classic Dreamcast library ready to go. The USB-GDROM supports raw GD-I image dumps and CDI (DiscJuggler) images, allowing you to run a full compliment of both commercial software and homebrew titles.
With the USB stick prepared and loaded with games, simply pop it into your USB-GDROM and power on the Dreamcast. After the usual bouncy Dreamcast animation you will be taken directly to the devices main menu.
No nonsense navigation

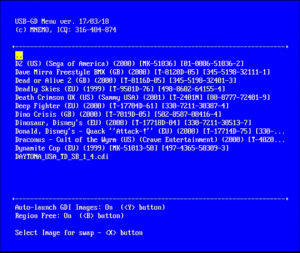
USB-GDROM has an easy to navigate menu/front end. Simply browse to the game you want to start and select it. Sub-directories are fully supported and can be named however you like, allowing you to organise your library of games however you choose. Apart from just loading a game, you can select any image as your “swap” image. The swap image will be loaded if you open and close the Dreamcast’s drive lid (but only if you installed the drive door switch mod). This is a lot better than the system on the GDEMU where you can only use the image in the next directory. If you don’t set a swap image, you can go back to the USB-GDROM menu by simply opening and closing the drive door then starting the game from the Dreamcast’s BIOS menu.
The USB-GDROM menu works in both 31khz (VGA) and 15khz modes, making it suitable for every Dreamcast setup. In 15khz mode the menu runs in interlace.
Our USB-GDROM had some issues starting GD-ROM image games when we first installed it but this was fixed with an updated firmware file. Our little technical support request was resolved very quickly by 3do-renovation, really we couldn’t ask for better after sales support. Once this minor issue was fixed, every game we threw at the USB-GDROM worked perfectly, from homebrew/unlicensed titles like Gunlord or Ghost Blade to popular commercial titles like Crazy Taxi or Shenmue. USB-GDROM also has a region free mode, this can be toggled on or off, just in case any game should prove to be incompatible with it.
Apart from being a little plain (it would have been cool if we could set a background image as wallpaper) the menu works perfectly. It responds quickly, browsing directories, even with several games in them, is fast and easy.
Got me burning up
We’ve tested the USB-GDROM for several hours and our only concern with the hardware is that the Dreamcast’s power supply seems to get extremely hot after extended play sessions. After doing some brief research, we’ve found that this could be to do with the now redundant 12v load on the Dreamcast’s PSU (details here). The reddit page in the link proposes a relatively simple solution whereby the power supply is modded to remove this now unnecessary 12 volt load. In the near future we’ll give this mod a go and update the review accordingly.
Dreamcast delight
The USB-GDROM really is an amazing upgrade for the Dreamcast. Frankly, it’s impossible not to be impressed by hardware like this. The sheer convenience and wow factor of running your entire collection of Dreamcast games from a USB stick, with reduced loading times and no chance of disc read errors is simply fantastic.
Inevitably, comparisons will be drawn between the USB-GDROM and the GDEMU, but it’s really obvious which is the better, more polished product. Compared to USB-GDROM, GDEMU feels like prototype hardware. On the USB GD-ROM there is no fiddling with renaming image files, no pushing buttons to change images and of course, full support for directories and sub-directories. USB GD-ROM uses larger, more affordable media and does not require an SD card reader on your PC. 3do-renovation have a feature comparison chart here, with the only advantage of GDEMU being that it’s significantly cheaper. One thing not mentioned in the chart, which we feel really is the devices greatest strength, is availability. Trying to obtain a GDEMU board is a little like trying to buy tickets to some kind of exclusive rock concert. Deunan’s (the creator of the GDEMU) refusal to operate any kind of waiting list or pre-order system, or work with others who would, means your only choice is to wait around when orders are opened and pray that you get lucky. We tried for nearly a year to buy a unit and constantly missed out, which is extremely frustrating; contrast that with the USB-GDROM, where we simply filled out the form on the website and were contacted about a month later to make payment. Once payment was made, our USB-GDROM was delivered within a month, completely frustration free. This reason alone is enough for us to recommend the USB-GDROM over its competitor, the fact that it is also a much better piece of hardware is icing on the cake.
[taq_review]

i am from brazil . where can be found this usb gdrom adapter? and a pendrive with the games?
http://3do-renovation.ru/USB-GDROM_Controller.htm
It looks like you removed the black tray, this changes the way the DC was designed to be cooled, put the tray back in and it doesn’t heat up.
black tray?
I’ve had this device for several years now (an earlier revision which suits my needs better than the current one) and it is stellar. While I always missed an opportunity to purchase a GDEMU before and after I got the USB GD-ROM, I managed to get in touch with Mnemo back then with a bit of luck and everything went well.
Might be good to mention, people have made 3d models for usb trays to give it a more aesthetically pleasing look: https://www.thingiverse.com/thing:2379444 and https://www.thingiverse.com/thing:2302737
I don’t want to advertise other people’s products too much on your site, but you can buy first one linked here (kinda pricey though).
https://bit-district.com/console/sega-dreamcast/usb-gdrom-tray.html
Couldn’t agree more. I’ve had my USB-GDROM for years now and absolutely love it!