AV Guides, Games Room Equipment, Games Rooms, Howto & Guides
Building our New Games Room – Part 8 – Furniture and fixings
Welcome to the eighth part of our games room build write up and guide. By this point we have decided on displays, sound systems, cable management, lighting and networking. It is now time to bring it all together and decide on the furniture and fittings which will house our games consoles, gaming PC and accessories.
Check the web for inspiration

Your own games room will be unique, just like you, so it’s helpful to have a look around the web for some ideas. Google image search, Pinterest, Instagram, there’s all kinds of places to find them. All sorts of people have built games rooms in all sorts of different sized rooms, with different features and advantages and disadvantages to each one. Many “video game room tours” can be seen on YouTube, where folks proudly show off their setups, good and bad, and discuss what works and what doesn’t.
A word of warning when looking over other peoples rooms. Your room is probably not as big as your imagination will make it out to be. When you see a huge room, filled with consoles and lights and toys and wonder, remember that, unless you’re very lucky, your setup may have to be more modest.
Consult your room plans, or even lay out the consoles themselves
We have previously talked about using computer aided design or drawing programs to make out room plans. This software can be an invaluable tool when considering what furniture to buy too. If you’re not so confident with tools like this on the PC, you could always resort to graph paper instead. Create scale models of your consoles out of cardboard and move them around on your graph paper to get a feel of where everything could fit.
If the floor in your room is currently empty, why not take the consoles you want to use (at least on the bottom level of shelving), lay them out on the floor and see if they fit? If things seem to be too cramped already, they aren’t going to get any better after you add furniture.
Leave some space to enjoy your space

If you have a huge games collection you might be tempted to cram every last bit of space on every wall in your room with shelving and desk space for your retro consoles and computers. Think carefully how you want to use the space you are creating before you do this. If you are building your room in a spare bedroom, typically these rooms are designed for a child and won’t have the same sort of space you might enjoy in your lounge. Do you intend to have friends over? You might be comfortable in the space on your own, surrounded on all sides by stacks of retro gaming hardware, but cram two or more other adults in with you and the room can quickly become hot and overcrowded. If you intend sharing the space with children, that of course brings its own set of safety considerations, especially if you’re letting them enter the room unsupervised at any time.
When it comes to cables and collectibles on shelves, don’t underestimate the destructive capability of a wagging dog tail or errant paw either. If you prefer a feline friend, remember many cats love to sit in enclosed spaces, the kinds of cubby-holes that are perfect for putting consoles in.
Consider seating choices and spacing carefully. At the most basic levels, if you are using a monitor with poor viewing angles (for instance one of the curved ultra-wide monitors) then you will want to be able to move your seating to accommodate for this, especially if you intend playing multiplayer games. If you have a surround sound system and you position your seating incorrectly, the positional audio won’t work for your audience. If you intend to play party or motion controlled games, like DDR/Dancing Stage, Kinect, Wii, PS Move or Virtual Reality, you will probably need to leave space so that the furniture can be moved to accommodate these activities.
Where you choose to position your screens can make a big difference. In particular you should avoid putting screens opposite a window. The glare from a window as the light comes in will reflect badly on a CRT in particular, but it can also affect the visible peak brightness levels of the most modern HDR ready TVs too. If you have no choice in this, consider installing black out blinds or curtains over the window for when you are using your display.
Consider both the vertical and horizontal positioning of your screens. You may not have considered horizontal position to be that important but it can make a difference. For example, in our room, rather than position our 4K TV centrally on the east wall, we have it on the left of this wall, with the CRT on the right. This was the only way to fit these displays in the available space, but it has some side effects. Our displays are close to the connecting north and south walls of the room respectively. While this is absolutely fine for single player, when playing a local multiplayer game with several guests, like Bomberman for example, people can’t gather around the display, since you can only sit to one side of it. Of course, most of us are going to have to make compromises somewhere but it is important that you keep things like this in mind so you can make the right compromises for your particular requirements.
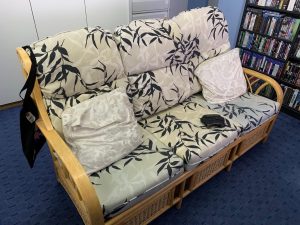
For our seating, we use a Noble gaming chair for ‘serious’ PC gaming and work. We do not particularly recommend this model over any other (especially as the seat cover on ours has cracked after a few years of ownership) so just choose whatever chair suits you best. Office or gaming chairs are typically on casters and so can easily be moved to the side of the room when not in use. For further seating, we opted to re-use a three seater cane sofa from our old conservatory in the UK. This is comfortable but crucially very small and light compared to a regular living room sofa and it can easy be pushed around the room as necessary for whatever gaming activity we’re doing at the time.
He’s heating up!
Games rooms can get hot. TVs, home theatre systems and especially gaming PCs can put out a lot of heat, so you might want to consider ventilation. Adding an air conditioner might even be necessary if your room is somewhere that gets a lot of sunshine. Air conditioners are not the most environmentally friendly of contraptions, so use them in moderation. Simply opening a window or two, especially in winter, will probably be enough for most spaces.
Off the shelf versus custom built

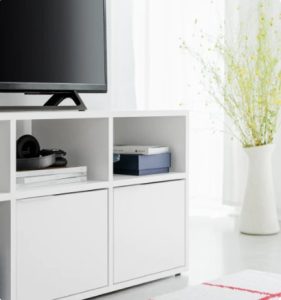
Do you buy the shelving for your games room from a local furniture store, or do you go to the trouble and expense of having it custom built? Like so many things in life it will probably come down to your budget. There are many great off the store shelf storage solutions for media devices and consoles. Ikea is a popular choice amongst gamers and units such as this one could be ideal for your needs.
If you need something a little more customisable, how about Tyklo’s range of easy assemble and highly customisable shelving?
There’s nothing wrong with simply going to a local furniture store armed with your trusty tape measure and just measuring up a few units to see how they might fit. Buying off the shelf will save you a lot of money so even if you’re almost certain you will have to go custom build, it’s worth a try at least. You may even get some ideas for the bespoke furniture you eventually build by looking at this furniture in the store.
For our particular build there simply wasn’t anything off the shelf that could accommodate all of our outlandish ideas, so going custom build was the only choice. In the next article we’ll give those of you who are interested a tour of our final setup including some concept sketches and work in progress pictures, as well as discuss what worked well, what we might do differently with the benefit of hindsight and what we would have liked to have done with a bigger space. You can now read that article by clicking here.

