Noob Cable Ordering Mistake – Help Me Correct It
NewHome › Forums › OSSC, OSSC Pro and DExx-vd isl › OSSC – Discussion and support › Noob Cable Ordering Mistake – Help Me Correct It
- This topic has 16 replies, 4 voices, and was last updated May 6, 2018 at 6:13 PM by
nmalinoski.
-
AuthorPosts
-
April 26, 2018 at 1:55 AM #21141
Anonymous
I’d like to think I’m learning fairly quickly here, but I ordered a PS2 and Sega Saturn cable when I first got my OSSC and obviously didn’t understand completely what I was doing.
I ordered this cable for the PS2:
It specifically notes that it has resistors removed specifically for the PS2. Ironically, though, I’ve got the PS2 going component cable output to a component switcher (this was a more convenient configuration in the whole scheme of my setup), and I’m now using the SCART cable exclusively for PS1.
And as a result (I believe), I’m getting this effect (checkerboard pattern):
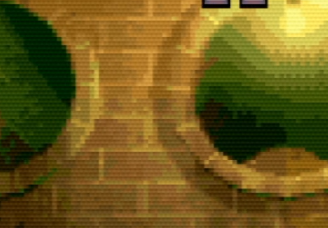
Correct me if I’m wrong, but that’s not normal, is it?
Can I simply correct the situation by adding the resistors back in? And if so, what lines, and what value resistors?
April 26, 2018 at 2:03 AM #21146If you read a bit closer, it says that the cable omits capacitors, not resistors–very different components.
To get the cable to-spec for your PS1, I believe you can just add 220uF capacitors to the R, G, and B lines, but someone more knowledgeable will need to confirm that.
April 26, 2018 at 4:07 AM #21147My bad I mis typed…I know they are caps. Well I’m going to order some caps. If it’s a bad idea to add them someone please chime in within a couple days, before they arrive.
April 26, 2018 at 2:31 PM #21167You should definitely add the capacitors to get everything to spec, but it doesn’t look that far off normal. It looks like you have scanlines on, so if you don’t then I guess that’s a problem. Otherwise, the PS1 is known to have pretty bad dithering in some situations, so it can look pretty bad when scaled up.
April 26, 2018 at 4:16 PM #21169Otherwise, the PS1 is known to have pretty bad dithering in some situations, so it can look pretty bad when scaled up.
Yep, this. Some titles – such as Gran Turismo and Silent Hill – exhibit that quite glaringly, especially when you switch from CRT screens to current displays with scalers. It comes out extremely obvious.
Also. Are you using an actual PlayStation to run PS1 games, or your PS2?
I’m asking this because I noticed – not investigated it yet, due to the lack of the necessary hardware – that my Japanese (fat) PS2, even with all the back-compat. enhancements turned off, seems to introduce some very odd artefacts to the PQ of some PS1 games – Tekken 3 and Tobal 2, to mention the first ones popping out of my head – similar in many ways to a ‘grid’ pattern.April 26, 2018 at 4:20 PM #21170Okay, thanks noodohs. The pictures really don’t capture it above….not enough granularity on what gets displayed on this forum. But the links to the images are here, and the first one at least has much more clarity and you can zoom in on it:
https://klovimg.com/image/6CKXi
https://klovimg.com/image/6CN5EThe checkerboarding is pretty bad (is that synonomous with dithering?). The scanlines do compensate for it to a degree. I ran the game on pcsxr, at 1920×1080, and it was smooth as can be. But maybe that’s not an apples-to-apples comparison?
Well, I’ve ordered the caps and will mod the cable. If it seems I’m fussing over nothing after you see the above images, let me know.
April 26, 2018 at 11:58 PM #21184Okay, I’m now up to speed on ps1 dithering, and jeez it seems what I’m complaining about is full screen dithering which is a function of the PS1 itself. Bummer, cuz SFEX2@ looks stunning except for the dithering. It was happening on Crash Bandicoot Warped also, which are the only 3D games I own on PS1 so far. A bit discouraging…but reason to start digging into some of the lesser line multiplication modes for PS1 3D games, and see what looks the best.
April 27, 2018 at 3:45 PM #21196Yeah, PS1 doesn’t hold up all that great 🙁 FYI at Galdelico, the PS2 is not perfect in terms of backward compatibility. While it does have a PS1 CPU on board, it uses the PS2’s video output, so there are some issues in certain games. You can see this in the MLiG video on the PS1. For example, the moon on SotN doesn’t fade out properly on the PS2, some of the transparencies don’t seem to look right… it’s definitely better (visually) to play on PS1 if possible.
Side note, turns out I’ve also been using a PS2 cable with my PS1. Oops. Guess I need to order a new one :p
April 27, 2018 at 4:35 PM #21198Sorry Galdelico, I didn’t see your question. PS1 games on PS1.
I did, in my research yesterday, find a great auto-patch program, for patching iso’s to disable dithering. The only one I’ve tested so far is Street Fighter EX 2 Plus Alpha, and the results were amazing. The dithering is gone, and it looks exactly as it did in emulation.
I will post some comparative screenshots tonight, but for anybody that wants the auto-patch tool, the download link is here:
https://drive.google.com/file/d/1CT-8mWmguE5cBHQmBiGi4B6yP0ckgEUK/view
Read the readme, it is as simple to use as it can possibly get.
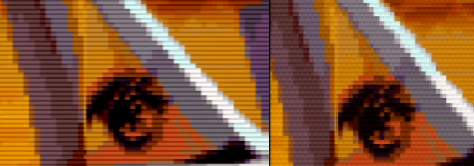
May 1, 2018 at 6:48 AM #21274Sorry it took a couple days, but here’s a quick side-by-side of the tail of the plane, in Guile’s stage, in Street Fighter EX 2 Plus @. The image on the left is post dither patch of the disc image, on the right is original game code.
 May 1, 2018 at 4:34 PM #21284
Sort of related, but what is your method for playing these patched games? I have no idea how that kind of thing works on PS1. It looks great and I’d love to give it a try.
May 1, 2018 at 9:52 PM #21290I hope its okay to post this here. MM3 modchip: https://www.ebay.com/itm/Multimode-3-MM3-PlayStation-1-PSX-PS1-PSone-Modchip-New-Prewired-/232495820131?hash=item3621d4ad63
I tested the same chip in a 1001 and 7501, due to the laser failing in the 1001 and the replacement laser only playing nice with original disks for whatever reason. The seller was extremely helpful, and provided support through swapping the modchip from the 1001 to a 7501. Prior to the laser failing, the chip was working great in the 1001, and it’s working great in the 7501 now.
May 4, 2018 at 7:24 PM #21344I added the 220uf caps on the R, G, B lines, which I confirmed is the only lines needing them, per the following SCART cable instructional:
http://members.optusnet.com.au/eviltim/gamescart/gamescart.htm
Not noticing a huge difference, but maybe it aided in dialing in the PS1 to what I consider to be as good as it gets:
https://videogameperfection.com/forums/topic/tips-tweaks-lx3-lx4-lx5-modes/page/8/#post-21343 (post #21343, if it doesn’t direct link to the post)
May 4, 2018 at 7:29 PM #21345I just got in the cable from Retro Access, which I think has 1000 uf caps in it. We’ll see how much difference it really makes, but I’d rather have the right cable than not. Plus I need one for my PS2 anyway… Man, the dithering on Dino Crisis is really quite horrible. Thanks, PS1.
May 4, 2018 at 8:20 PM #21349I just got in the cable from Retro Access, which I think has 1000 uf caps in it. We’ll see how much difference it really makes, but I’d rather have the right cable than not. Plus I need one for my PS2 anyway… Man, the dithering on Dino Crisis is really quite horrible. Thanks, PS1.
I ordered my PS1 SCART cable from Retro Access and requested that it specifically be built with 220uF caps so it would be as close to the original specification as possible..
If you’re handy with a soldering iron, and you don’t want to bother with YPbPr component, I recommend removing the 1000uF caps from the cable you already have so it can be to-spec with your PS2, and then order another SCART cable, specifically with 220uF caps, just as I did, to use with your PS1.
-
AuthorPosts
- You must be logged in to reply to this topic.