Nintendo RGB Bypass Amp (Revision 4.1b-VGP)
€16.90
€20.11 incl. VAT
VAT inclusive price is estimated based on the geolocation of your browser and may be subject to recalculation at checkout. What's VAT?
25 in stock
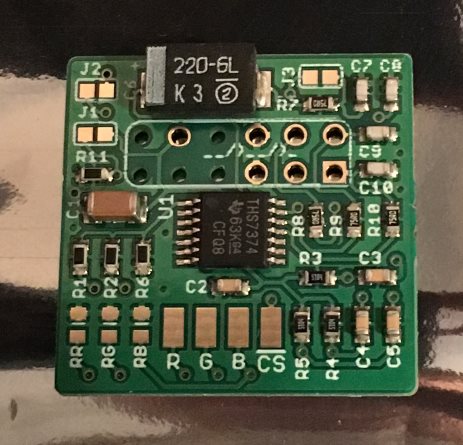
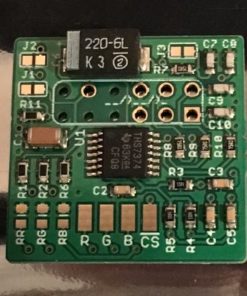
The Nintendo RGB Bypass Amp is a professionally made RGB amplifier for New-Style Super NES/Nintendo Super Famicom Junior and SNES Mini consoles (this product is not designed for and cannot be used on the Nintendo Classic Mini). The part is ideal if you want to RGB upgrade your SNES Mini console. The part also works in 1-chip Super Nintendo/Super Famicom consoles and may give a better, more vibrant picture compared to the stock RGB encoder (check here if you’re unsure about SNES console revisions).
For fitting instructions, please see this page.
Our newest revision of the amp includes several improvements:-
- Uses the THS7374 amplifier, which can generate a sharper image.
- User selectable low-pass filter.
- Optional buffered CSYNC (clean composite sync).
- New – User selectable CSYNC output, choose between 75ohm or TTL.
Instructions for use
Please follow the installation guide as provided by Borti4938 here. The guide assumes some familiarity with the internals of the SNES console.
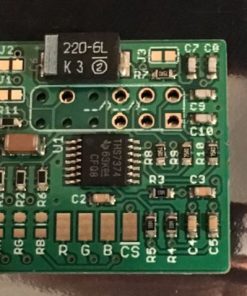
Note – If your RGB amp does not look like the one pictured above, you may have an earlier revision. Click here for key points on the Revision 4.0 amp, or here for key points on the Revision 4.1A amp.
Key points:
1. This amp has been configured for use with an NTSC spec RGB SCART cable. Please use a SCART cable designed for an NTSC Super Nintendo/Super Famicom console, even if you install the upgrade in a PAL machine.
2. Because the amp has been configured for use with an NTSC cable, if you have a PAL console and your RGB cable uses composite video for sync then you will need to select the “I have a PAL SNES” option above and replace R18 on the SNES main board with a 75 ohm 0805 package resistor that will be provided with your order.
3. Brightness fixing – Our old RGB amp produced an excellent picture but one that was slightly too bright. The original design of this new amp included a brightness fix component, however this has been removed from our final version. Instead, we recommend Borti’s new fix which also helps remove the ghosting effect that the 1CHIP and SNES Mini usually suffers from. See the guide here for details of how to perform the fix.
For instructions on how to fix the brightness, see this link. Note this fix no longer addresses the ghosting issue too, to fix the ghosting issues, replace capacitor C11 on the SNES mainboard, as per the instructions on Borti’s Github.
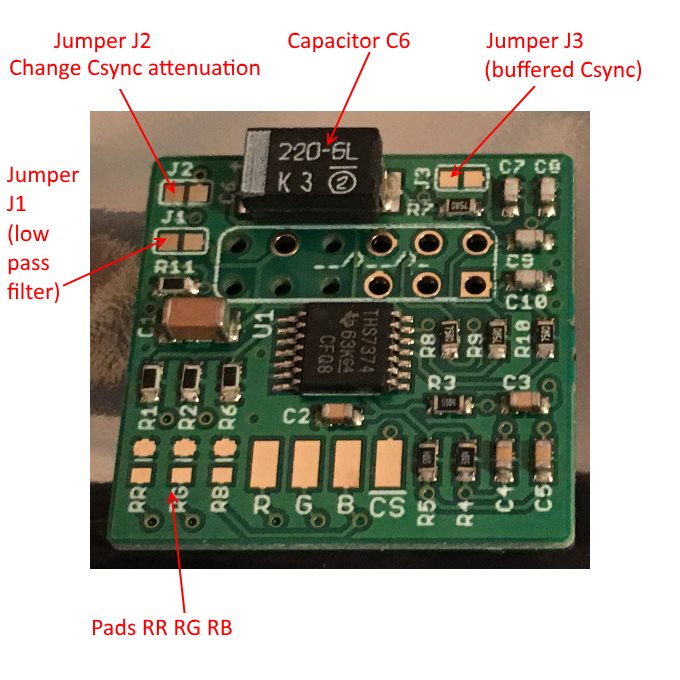
Pads RR, RG and RB have been left on the RGB amp for the old brightness fix if you prefer to use that method. You will need to acquire and then solder 3 x 1.2k ohm 0603 resistors to the pads for the SNES mini/SFJr system or 3 x 750 ohm 0603 resistors to the pads for the NTSC or PAL 1CHIP system.
Do NOT install both brightness fixes simultaneously.
4. Before installing the RGB amp, make sure to remove the following components from the SNES mainboard.
PAL and NTSC SNES systems:
- Remove C44, C45 AND C47.
New-Style Super NES (commonly referred to as SNES Mini or SNES Jr):
- There are no components to remove (the above components should not be present anyway).
Whilst removing these components you will also need to either remove R15, R16 and R17 or lift pins 20, 22 and 24 of the S-RGB chip on the SNES mainboard. Again, for New-Style Super NES systems this step is not necessary as these components are also not present.
5. If you wish to use the buffered Csync on the RGB amp then you will need to solder bridge jumper “J3”. You must also ensure that pin 3 of the MultiAV on the SNES is freed before starting the installation. To do this, remove components from the SNES main board as follows.
On PAL SNES systems:
- Remove R28 and C46 from the bottom side of the SNES mainboard.
- Optionally also remove D1.
On NTSC SNES systems:
- Remove R11, R12 and C46.
- Optionally remove also Q1, R9 and R10.
On New-Style Super NES (SNES mini/SFJr) systems
- There is no need to remove anything. The above components should not be present.
6. If your device doesn’t work well with the buffered Csync on the RGB amp you can try bypassing capacitor C6. The bypass jumper for this purpose (previously known as “J2”) has now been moved back to it’s original location beneath the capacitor so you will need to remove the capacitor to close the jumper. The jumper marked “J2” on the v4.1b PCBs is now used for another purpose and should not be confused with this one.
7. This board has been configured to output 75ohm terminated Csync with either a straight through connection or a 470ohm attenuated connection. The PCB is configured for a straight through connection by default (in other words, it outputs properly attenuated 75ohm CSYNC), so If your SCART cable does not have a 470ohm attenuation resistor installed then you will not need to change anything.
If your SCART cable has a 470 ohm attenuated connection (attenuation resistor installed), then you will need to solder jumper “J2” to get the correct voltage level for 75ohm Csync. It is strongly advised not to solder jumper “J2” unless you definitely know that your cable has a 470hm resistor installed on the Csync connection otherwise you may possibly damage your equipment.
If you need a new Csync cable to use with your upgraded console, you can use the NTSC SNES PackAPunch cable available here. Choose either the “CSYNC TTL 2.5 Volt” option (and leave J2 open) or Csync 470ohm option (and solder J2 closed) when purchasing the cable.
8. Jumper “J1” is for the low pass filter.
-
- Leave J1 open: internal filter of EACH channel is NOT bypassed (low pass filter is ON).
- Close J1: internal filter of EACH channel is bypassed (low pass filter is OFF).
Important – Missing top line issue
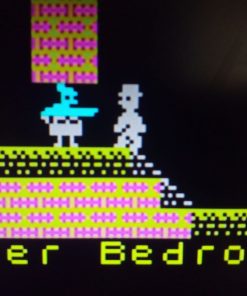
It has come to our attention that installing the RGB bypass amp may cause some games to lose the top few scanlines from the picture. Below is an example of this phenomenon. Click on the picture to enlarge it.
The issue only affects a small number of games. We believe this is an acceptable trade-off for improved picture quality. We are always actively researching and improving our upgrades and should a fix appear for this issue we will incorporate it into our work.
Please note these parts are intricate and require soldering skills to fit. We cannot provide technical support with fitting, if you require a professional fitting service see our console upgrades section. While we cannot offer technical support for DIY installations/parts, community based support for our upgrades is available in the forum here.
Based on an open source design by Borti4938. Interested in building your own? Check out the Github page here.
Super NES/ Super Famicom and Nintendo are trademarks of Nintendo Co. Ltd. RGB Bypass Amp is NOT and official Nintendo product.
Related
| Weight | 15 g |
|---|---|
| Country of Origin | CN |
| hscode | 9504500000 |
| Customs Description | Component for videogame |
7 reviews for Nintendo RGB Bypass Amp (Revision 4.1b-VGP)
Add a review Cancel reply
Related products
Mod kits and spare parts
€9.15
€10.89 incl. VAT€41.00
€48.79 incl. VAT€0.30
€0.36 incl. VATMod kits and spare parts
€19.15
€22.79 incl. VATMod kits and spare parts
€45.00
€53.55 incl. VATMod kits and spare parts
€15.95
€18.98 incl. VATMod kits and spare parts
€30.00
€35.70 incl. VATMod kits and spare parts
€76.50
€91.04 incl. VAT






NB –
Recently I’ve bought myself a good lot of proper solder/desolder tools to mod, recap, repair consoles I own. This RGB bypass was one of the early projects I done as it’s among the easier mods. Everything went well and then I powered on the SFC Jr, it didn’t sync properly with my PVM at first. So I checked connections and solder joints and they were fine. Then I tried closing J3 with solder for buffered C-sync, and now it’s working perfectly. Using RetroGamingCables SNES RGB scart cable with 470ohm attenuation. So for this combination, close J2 and J3 and you’re good to go. It’s worth trying J3 if it doesn’t sync with your particular setup.
wisepass –
I bought one of these after recapping a CRT TV recently. I’m otherwise a novice modder, but I felt this was well within my current skills. However, the unit I ended up receiving wasn’t transmitting c-sync to the final pins despite being well soldered. So I was just getting a scrolling / juddering mess on my CRT. I only realised this after much troubleshooting and tracing the signal. In my initial efforts of thinking it was my novice skills (much desoldering), I ended up bricking a snes mini, since I only realised when I had the exact same problem when installing in a second unit. I’m a retro fan like the guys at retroperfection are, I hope they check this and make sure its not a chronic issue. In anycase if anyone ends up in the same situation I hope this helps.
BuckoA51 –
Sorry to hear that, no I’ve not heard of any other amps from this batch doing that.
AndehX –
Ordered one of these last week. I had the DIY 7316 amp installed, but I wanted something cleaner that could restore CSYNC to my PAL console.
Installed with no trouble at all, and works perfectly.
My SCART cable is wired for sync on luma, so I disconnected luma from the multi-out and simply jumped CSYNC over to the luma pin. Good stuff.
https://i.postimg.cc/hjkjK1T9/77187795-574664859934559-2942167887567126528-o.jpg
Revan –
Needs more work for PAL
I’ve just had someone hired who works on a modding service in Melbourne tried to install this kit plus the SuperCIC as well. So far it hasn’t gone well for my PAL 1chip-01 console. He ended up sending it back despite asking him to check on shmups for help after being able to get sync but no image coming from the mod.
The modder believes the kit is faulty or my snes is dead, I’ve tried desoldering the kit itself from the snes board but I’m not skilled enough to get the solder off the pins and I’ve ended up hitting small resistors around the place, I gave up trying to do it myself.
I don’t want to pay another $200 AUD for mod work again and the risk for installing in a PAL console with a NTSC cable is risky, my recommendation for anyone just import a Super Famicom 1chip if you can, the instructions need more work and I had no trouble installing etims rgb kit in my pal n64.
Admin response – Sorry to hear that. Did you follow the key points particularly for PAL machines? If you believe the amp is faulty we will exchange it for you.
N64Noob –
I had bought a pre-RGB-modded N64, with the idea of that I wouldn’t have to do it. Turned out the RGB mod was total mess with wires all over the place. I desolded all of that rubbish, and correctly installed this great little circuit. Worked first time! I’m very happy now, and can play on my LCD screen! (Yes, yes, people like CRT better, but I just don’t have the room)
Note – This review was for the old version of this product and N64 isn’t officially supported with this amp.
Justin –
Installed one of these this morning, worked first time.
RGB picture is far superior to composite output, works great over cheap, unsheilded RGB cable and 3metre extension running through the wall.
Very happy
Note – This review was for the old version of this product.
Nick –
Perfect
I have two of these little beauties, one in my SNES Mini and one in my N64. The THS7314 is pretty much the best video amp available these days, the colours are very vibrant and razor sharp, and it was very easy to install, too. Extremely happy.
Note – This review was for the old version of this product.