Emulator Guides, Howto & Guides
HLSL for everyone
 It’s hard to imagine for anyone who wasn’t around in the 80s and 90s just how huge the arcade scene used to be. Arcades that are now either closed or dedicated to gambling machines hosted wall to wall video game cabinets back at the peek of the coin-op boom. Tracking down the original hardware for the many thousands of coin operated games is simply impossible for all but the very richest of collectors. Because of this, MAME, the Multiple Arcade Machine Emulator is probably the most widely used and most loved emulator on the PC. Games which would be completely lost to everyone bar an elite few are now playable on your PC, as long as you can find the ROMs of course.
There are lots of tutorials for setting up MAME on the internet, so we’ll assume that you are at least familiar with getting the basic emulation working, though we will cover that briefly too. The main focus of this tutorial will be on HLSL. HLSL is an acronym for “High-level shader language”. Your first thoughts might be that this would only be useful for 3D games, but HLSL can work at a per-pixel level. We covered the basics of what these new shaders can do in our article here. When creating the tutorial we used MAME Plus, which can be downloaded here, but you can use any recent build of MAME that you are comfortable with.
Getting Started
Once you have downloaded MAME Plus or whichever build of MAME you want to use, extract it to a folder on your PC. Set the path to your ROMs (Options->Directories in most GUI versions) and check that basic emulation is working just by clicking any game, Neo Geo favourite Metal Slug is always good as a trial run.
Once you have confirmed that things are working, it is time to enable a basic HLSL configuration. When using HLSL, make sure your Windows desktop resolution is set to your displays native resolution for best results. You can enable HLSL from the GUI, but it’s just as easy to do it by editing the ini file. Browse to your MAME directory and find the mame.ini text file. Open this up in notepad and find the line that reads “hlsl_enable”. Change this from 0 to 1 and then save the file. If you’ve never edited configuration files before, there’s a newbies guide here. For the absolute bare minimum this is actually all you need to do, but it’s unlikely this default configuration will yield very pleasing results. Nevertheless, if you’ve never tried HLSL before, you should save the file and fire up MAME again, just to make sure everything still works. You should see some scanlines on your game and the brightness of the picture should have changed. If you can see these changes then HLSL is working on your PC.
Finding a HLSL for you
Unless you’re an expert user, you’re probably going to want to borrow a HLSL configuration from elsewhere on the web rather than try to come up with your own. Luckily there are lots of places we can do just that. My favourite is this thread over on the Shmups forum. Here you can browse screenshots of what other users have done with their HLSL configuration and grab their settings to try for yourself. You will also find mention of an “ini file creator”, but more on that later. Since the thread is a little daunting to wade through, here’s an example configuration that just does the very basics.
#
# DIRECT3D POST-PROCESSING OPTIONS
#
hlsl_enable 1
hlslpath hlsl
hlsl_ini_read 0
hlsl_ini_write 0
hlslini %g
hlsl_prescale_x 0
hlsl_prescale_y 0
hlsl_preset -1
hlsl_write
hlsl_snap_width 1920
hlsl_snap_height 1080
shadow_mask_alpha 0.1
shadow_mask_texture aperture.png
shadow_mask_x_count 320
shadow_mask_y_count 240
shadow_mask_usize 0.09375
shadow_mask_vsize 0.109375
curvature 0.0
pincushion 0.02
scanline_alpha 1.0
scanline_size 1.0
scanline_height 1.0
scanline_bright_scale 1.0
scanline_bright_offset 0.0
scanline_jitter 0.05
defocus 0.0,0.0
converge_x 0.2,0.0,0.0
converge_y 0.0,0.0,0.0
radial_converge_x 0.2,0.0,0.0
radial_converge_y 0.0,0.0,0.0
red_ratio 0.85,0.15,0.0
grn_ratio -0.05,1.05,0.0
blu_ratio -0.025,-0.025,1.05
saturation 1.0
offset -0.15,-0.16,-0.16
scale 1.15,1.16,1.16
power 1.1,0.95,0.8
floor 0.0,0.0,0.0
phosphor_life 0.0,0.0,0.0
#
# NTSC POST-PROCESSING OPTIONS
#
yiq_enable 0
yiq_cc 3.59754545
yiq_a 0.5
yiq_b 0.5
yiq_o 0.0
yiq_p 1.0
yiq_n 1.0
yiq_y 6.0
yiq_i 1.2
yiq_q 0.6
yiq_scan_time 52.6
yiq_phase_count 2
#
# VECTOR POST-PROCESSING OPTIONS
#
vector_length_scale 0.8
vector_length_ratio 500.0
#
# BLOOM POST-PROCESSING OPTIONS
#
vector_bloom_scale 0.3
raster_bloom_scale 0.1
bloom_lvl0_weight 1.0
bloom_lvl1_weight 0.21
bloom_lvl2_weight 0.19
bloom_lvl3_weight 0.17
bloom_lvl4_weight 0.15
bloom_lvl5_weight 0.14
bloom_lvl6_weight 0.13
bloom_lvl7_weight 0.12
bloom_lvl8_weight 0.11
bloom_lvl9_weight 0.10
bloom_lvl10_weight 0.09
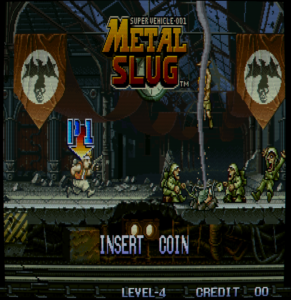
All you need to do is copy and paste this into your own mame.ini file, replacing all the existing HLSL settings. It’s a good idea to take a backup copy before you start chopping and changing things of course. Don’t forget to save the file and take a backup when you are done editing it too. Fire up MAME now and your game should look a little more like the screenshot shown below (click the picture to enlarge it).
Apart from scanlines and a little gentle curving of the edges of the image, these settings don’t really use a lot of the available features of HLSL, but they’re a good starting point and a much better default than the default HLSL settings MAME provides.
Sliding away
Editing configuration files is a good way to quickly change HLSL settings en-mass, but for those little individual tweaks, you’re going to want to learn how to use the slider controls, fortunately this is really easy. Start MAME and press the Tab key on your keyboard to bring up the menu. Use the arrow keys and enter to select “Slider Controls”. You will now access a menu where you can tweak most of the HLSL settings in real time. One setting you should pay attention to is “Screen Gamma”. This will often need tweaking. In Neo Geo games for instance, it may be too low, resulting in a dull looking image, while in other games it may be too high, causing detail to be lost in brighter parts of the image.
When you tweak settings here, MAME will remember your customisations and store them in a .cfg file in the cfg sub-folder. You can edit these files by hand if you want to, though it’s usually easier to fine-tune using the slider controls or create a custom .ini file for your game.
ini file creator
As you become more accustomed to using HLSL, you will notice that different games require different settings. Games which use 24khz or 31khz monitors wouldn’t have had scanlines in the first place and so (arguably at least) don’t require any HLSL processing. As we’ve seen, settings can be tweaked using the slider controls, but you can also have a specific .ini file for individual games too. Sometimes you will find .ini files for specific games on the internet, in which case it’s just a matter of downloading the .ini file and placing it in the ini sub-folder in your MAME directory. Of course, you can hand-tweak any settings in the file by editing it with Notepad or your favourite text editor.
HLSL expert Norman Ueda (AKA Nueda) has created an ini file generator that will create several presets for popular games. Sadly, Nueda announced that due to unforeseen circumstances he was halting development of his ini file creator for the foreseeable future. We can still make use of the ini files he did manage to finish though, simply visit this page on his blog to download the program.
The program is fairly easy to use and there are instructions on the site, just in case you are struggling, here’s a quick, simple tutorial.
1) Create a new folder in your MAME directory, the same directory where the MAME executable lives. call it ini_creator.
2) Download the INI creator zip file. Open the zip file and copy all the contents into the ini_creator folder you just made.
3) Check that the ini sub-folder in your MAME directory contains the MAME.ini file (the file you edited earlier in the tutorial). If it does not, copy it in from the main MAME directory.
4) Run the INI_creator_v0.3.bat file and everything else should be automatic.
Once the bat file has finished processing, you’ll have a whole bunch of .ini files for some of the most popular MAME games, all hand tweaked to perfection.
If you look in the ini_creator folder there’s a file called INI_creator_list_setting.txt. Open this file in a text editor and you can activate a few extra modes. For instance if you want all your games to look as if they are running on an old CGA PC, remove the semicolon before the line that reads “list_EXTRA_CGA.txt”. Save the file, backup your existing ini folder and then run the .ini creator again. Really these extra modes serve no practical purpose, but can be good fun to try and demonstrate just what’s possible with HLSL.
That’s all it takes to get started with HLSL. Now you have a pretty good looking MAME setup, but since this site is video game perfection, we won’t be stopping at merely “pretty good”. Our next tutorial will delve further into the customisations other users have made and how you can harness that for your own MAME setup. That tutorial is ready now and you can read it here.


disregard help ?
i need help on smoothing really badly
?
quick question how to smooth the pixels
i need help on smoothing really badly answer immediately ?
immediately answer plz ?