Portable gaming is great when you’re on the go, but once you return home, why would you want to play on a tiny screen with headphones when you have a big screen TV and home theatre system set up? Nintendo have certainly embraced the concept of playing portable systems on less portable displays in the past, with the likes of the Super Gameboy and the Gamecubes GBA player. Their latest console, the Switch, is built entirely around this concept too. No such official hardware ever existed for any of the super successful DS line of consoles, however. Given the DS’ unusual dual screen design, creating a big-screen player for the device isn’t going to be as straightforward as it was for the Gameboy, which is probably why Nintendo never bothered. Luckily, the gaming scene is full of very talented modders and hardware engineers, so it wasn’t too long before someone stepped in to finally bring the DS to the big screen. In this review we’ll be looking at the 3DS capture kit from the distinctly Japanese sounding Katsukitty.
Nekokoneko!
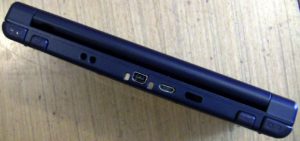
Katsukitty are a console mod shop based in Tokyo who specialise in capture solutions for hand-held consoles. Send them your DS console, or purchase one directly from them and you get a DS that’s cosmetically unchanged save for a single USB port mounted neatly on the back of the unit, to the right of the charging port. The mod doesn’t affect the existing functionality of the DS whatsoever, and given that this isn’t the most spacious of consoles internally, adding a full capture solution to it is quite some feat. We have to salute the skilled modding team at Katsukitty for making everything so neat. You wouldn’t know this wasn’t a factory fitted mod unless you looked really closely at the cutout.
Of course, solutions like this were created primarily for people who wanted to capture video from their DS console, for that the kit serves its purpose perfectly, but what about if you’re more interested in simply playing DS games on the big screen, is this a good solution for that too?
You’ve got wires

The first thing to do with your newly modified 3DS is figure out how to hook everything up. This is a capture solution, not a direct TV out, so that means you’re going to need a PC connected to your television. Not a problem if you have a PC in your gaming setup already, but if you don’t, you will need to drag over a PC in order to use the mod. Any reasonably modern device that runs Windows or OSX will suffice. You then install the capture software on your PC and hook the USB cable from your DS to your PC and then run the supplied viewer software. In our testing the device was a little finicky about which USB ports it could use. Try to connect it directly, rather than via a hub and you should be fine.
Unfortunately, the USB cable doesn’t carry sound, so you will need to hook up audio separately, by using the DS’s standard 3.5mm headphone output. This can be connected directly to a line in input on your PC or your sound card. We’ve found most on-board audio to be rather prone to noise when using analogue audio input or output, lucky for us our gaming PC still had an old-school Auzentech sound card. On our new 3DS XL, we found the audio to be way too quiet to be usable and had to add a simple headphone amplifier to the output in order to get the volume to a comfortable level.
Finally, of course, you will probably want to attach your DS charger. By the time you’re done, the cable jungle spewing from your console makes it feel rather a lot less portable. This is a far cry from the kind of elegant solution we’d have expected from a genuine Nintendo product, but at least it works.
DS XXXL

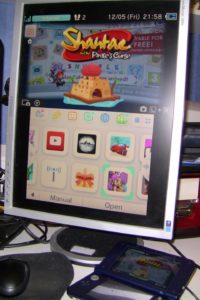
If everything went according to plan then as soon as you fire up the 3DS viewer software, you should see your DS on the big screen. By default you get the top and bottom screens shown on your monitor, which obviously leaves a lot of space. By pressing the F7 key you can toggle between showing only the top screen and the top and bottom screens together. You can also separate the top and bottom screens and arrange them however you want, this is great for video capture or if you have a multiple monitor setup. If you have a monitor that you can put into portrait mode, this fits the DS screen layout perfectly and can give some excellent results.
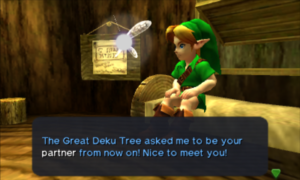
Running the 3DS for the first time on your PC certainly is an exciting event. Those tiny screens blown up on your monitor or even your HDTV are quite something. Of course, after the initial novelty has died down, don’t be surprised if you’re left thinking how blocky everything looks. DS games run at a resolution of 400×240 in 2D mode. That’s close to the 320×240 resolution retro consoles ran at, so basically they’re going to resemble PS1 or PS2 era games. As with retro games consoles, 3D tends to suffer more than 2D, with sprites and hand drawn graphics looking crisp, while 3D can look a little muddy and dated. To help with displaying graphics that were never designed for anything other than a tiny screen, the viewer software has two filtering options, bilinear and anisotropic. Both of the filters look very similar when in use. With the filters off, even 2D games look excessively blocky so you will probably want to use one or the other of them.
While DS game visuals are done no favours being blown up to big screen size, game audio almost always fares much better. Considering the limited storage space on DS game cards it’s genuinely surprising just how good DS game soundtracks sound once pumped through a high quality speaker system. As we mentioned before, we had to pass the DS’ audio through a headphone amplifier before the volume was at a reasonable level, but it was well worth jumping through those extra hoops.
The Katsukitty 3DS viewer also has options for showing the 3DS 3D effect, but we don’t have a 3D capable monitor here to test that with.
Back to DS

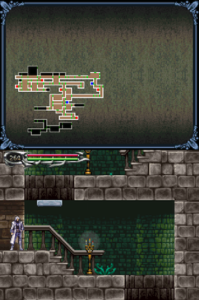
The 3DS also supports original DS games and as you can probably imagine these suffer even more when stretched up to such a huge screen size by the capture device. The original DS screens have a resolution of 256 × 192, which has to be scaled to display on the 3DS screen and then of course scaled again on your monitor. The results aren’t quite as bad as you might expect when playing dual screen mode, but blowing up one of the screens to fit a widescreen display isn’t going to look terribly pretty. Nevertheless it does work and if you can tolerate the blockiness many games look pretty good, with 2D games faring much better, as you would generally expect.
On the original DS, the top and bottom screens were both the same size, this means that some DS games chose to put the main action on the top screen while others chose the bottom screen. Frustratingly, only the top screen in the 3DS viewer software can be put into full screen mode on its own, meaning you cannot full-screen many original DS games.
The state of emulation
If you’re looking to play DS games on a bigger screen you might want to consider an emulator before investing in expensive hardware like the Katsukitty 3DS. Emulation of the original DS is actually in a fairly advanced state. The emulator DeSmuME X432R is powerful and flexible and has some fantastic antialiasing and up-scaling options that are of course impossible with something like the Katsukitty 3DS. It is certainly fair to say a bit of antialiasing and clever up-scaling makes a world of difference to 3D DS titles, while 2D titles can have a range of filters (including scanlines, Scale2x etc) applied to them.
DeSmuME isn’t perfect, in our tests the sound emulation frequently had glitches. Furthermore, there’s no way to separate the top and bottom screens into separate windows, nor is there a hot key for switching between top/bottom screen only and both screens, which makes playing lots of games in full screen mode quite frustrating. Disappointingly for those of you who invested in Windows tablets, its touch screen support is basically non-existent, with no proper support for touch devices at all. Nevertheless if you’re willing to persevere this is a fantastic way to automatically re-master many DS favourites and well worth considering if there are only a handful of DS titles you wanted to revisit on the big screen.
Emulation of 3DS games can be achieved by using the Citra emulator. As you might expect, this emulator is in a somewhat less advanced state than the DS emulators, but it does work well for a surprising number of games. Frequent problems include bouts of slowdown and occasional glitches. The emulator could also do with some polish, it lacks a proper full screen mode or any kind of fancy filtering. The emulator also requires specially decrypted ROM images which, naturally, are not to be found without visiting some of the shadier parts of the internet.
One big advantage of playing using an emulator is the ability to use a controller of your choice. We’ve always found extended sessions on the DS cause our hands to cramp, particularly with intense action games like Castlevania. Of course, many games require you to switch between controller and touch screen and there’s simply no way that doesn’t get frustrating when playing with anything other than an actual DS console.
Is it worth putting money in the kitty?
Make no mistake, obtaining a 3DS with a Katsukitty card installed will not give you the kind of smooth, big screen gaming experience you got from your old Gamecube Gameboy player. There are hoops to jump through to get the optimal experience, so is it worth it?
If you’re looking for a device to capture video or screenshots from DS games for your blog or Youtube channel then this is a good solution. It’s flexible and we didn’t find the software difficult to use (despite what other reviews have said).
If you want to play DS or 3DS games on your monitor or TV this device will do that, but don’t expect the experience to be as smooth as you might like. You will want your PC keyboard handy to quickly switch between viewing modes and you may find you need to add a headphone amplifier to the DS’ audio output. For original DS games in particular you may find that you need a monitor that you can put into portrait mode.
Then there’s the not insignificant question of cost. A new 3DS XL console costs around £170 (probably closer to £200 when we purchased our Katsukitty unit). A new 3DS shipped from Katsukitty cost us close to £480, more than twice the cost. By adding so much to the cost of your DS you start to question if you’d want to take it with you on your next outing, for fear of it being lost or stolen.
Overall then we are a little hesitant to recommend the Katsukitty upgrade. It works well, but it’s extremely expensive and in fairness, some of the challenges of making a DS player for the big screen are probably insurmountable (which is probably why Nintendo never made hardware themselves). If you’re determined that playing DS games on your TV is something you have to do, this device works as well as can be expected considering the challenge it is up against.


Besides the pixelated look on a big screen, does it plays well, without lag?
Thanks in advance