AV Guides, Games Room Equipment, Games Rooms, Howto & Guides
Building our New Games Room – Part 4 – Monitor Matters
Join us again on our games room build as we put into practise products from our store, knowledge from our how-to guides and the wider community and experience working with gaming setups, retro and modern, for many years. From the ground up we will be building a new games room in a spare bedroom, looking at how to get the most out of the available space and what gear we would recommend.
Welcome to the fourth part of our new games room write up. As you might have guessed, real life has got in the way again and we’re very late bringing you this latest instalment. However, I’m determined to finish these write ups, if only for my own benefit as I document this project and discuss what went right and what I might do differently were I ever to build another games room.
The display, or displays, you choose for your games room will be the single most critical component in the entire setup. After all, without video, there can be no games. As such, the choice of display is something video game fanatics will agonise over for quite some time, and rightly so. A display is a significant investment and one that will in most cases have to last us for several years.
A brief history of video game displays
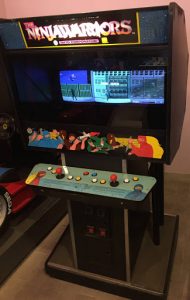
Imagine you wanted to be able to play every kind of video game released since the 1970s, how many displays would you need? Disregarding portable systems for now, the vast majority of games released used a 4:3 or 16:9 video display in landscape orientation. A standard, modern widescreen display coupled with an OSSC or RetroTINK can play most of these titles, though there are some caveats. Games with unusual resolutions or refresh rates (like the Sega System 24 board) and games which switch resolutions on the fly are the most problematic.
Vector based games, which were popular in the late 70s and early 80s require a special kind of CRT monitor. Few gamers go to the trouble of finding these authentic systems and instead opt for emulation. Only one home based system used vector graphics and that was the Vectrex console, which has its own built in screen.
Modern games run in resolutions that most CRT monitors and televisions simply cannot display. If modern gaming systems exist in your setup, some kind of 4k or 1080p display is a must.
What about more esoteric games? There are many arcade games that run in portrait mode, including a good number of excellent ‘shmup’ titles. If you intend to run these on original hardware, keep in mind it may be difficult, or even impossible, to find hardware that can process the image and flip it around to display on your big screen TV. The upcoming OSSC Pro promises to eventually deliver this feature, but for now you may have to factor in a portrait display to your setup if Shmups are your thing.
More unusual still are games like the Darius series, which actually spanned two or three monitors in the arcades. Only the most devoted of fans would consider obtaining three authentic CRT displays in order to faithfully recreate this experience. Realistically, some compromises will need to be made on display choice in most setups, with the more unusual games, such as vector based games, resigned to emulation. For our new games setup, we decided on a total of four displays, each with their own strengths and weaknesses.
CRT – The origin of all things – Mitsubishi Megaview XC3730C
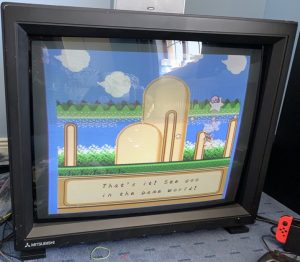
Multisync monitors, such as the Megaview, are highly prized by gamers. Unlike most consumer CRTs, the monitor is able to display both 15khz games from the likes of a Super Nintendo or Megadrive and 31khz content from the likes of a DOS PC or a more modern source such as an Xbox 360, or even from HDMI sources if used with a suitable adapter. It’s 4:3 aspect ratio means there’s no wasted screen estate when using the intended, vintage video game material.
The Megaview is a relatively low line count display which means it looks good with lower resolutions but soon gets blurry when dialled up past 1024 x 768. 1024 x 768 is more than enough for retro gaming of course, even allowing for some period accurate DOS or Windows gaming. If you do need to play something more modern, sticking to 720p at the maximum is probably for the best. The monitor doesn’t have a 16:9 mode but using the picture sizing controls it is possible to letterbox the image enough so that the aspect ratio is about right.
There’s no input lag, no delay when changing between 240p and 480i and light guns work perfectly. Composite, S-video and RGB are all accepted and look great. Component video and HDMI can be easily added using adapters. For HDMI, we used the excellent though now sadly discontinued HD Fury Nano.
This beast of a CRT monitor weighs just under 95kg. It is absurdly bulky, impractical to work with and noisy in use due to two large cooling fans. Its large size means it is particularly prone to bad geometry and loss of focus, especially in the corners. It will need degaussing if moved a long distance. The Megaview is testament both to what an incredible technology CRT was and to its obvious, inherent limitations.
If you’re determined to own a monitor like this, as I was, expect to spend quite some time hunting one down and be prepared to pay a premium for one too. Furthermore, if it does break down, getting a display like this serviced is no mean feat. Even if you can find someone with the skills to repair such obsolete technology, you still have the not insignificant logistical challenge of actually getting it to them in the first place so they can work on it.
Finally, if you’re bringing a set like this into the house, don’t forget to include the dimensions of the flight case when measuring it up. Inside its case the Megaview was too big to fit through our front door and rather than risk damage to either the monitor or the property we ended up paying for professional help to have it moved into position.
Ultra wide – An infinity that surpasses the heavens – Samsung LC49RG90
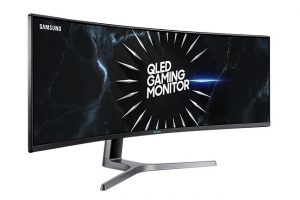
Why have wide when you can have ultra wide? Ultra wide gaming is making a splash with PC gamers and, if you get your hands on one of these monitors, it’s easy to see why. With a colossal canvas of 5120×1440 this monitor is a dream for productivity. Furthermore, for games which support it, the monitor gives a dazzling, sometimes transformative experience that will remind you why you invested so heavily in PC gaming in the first place.
If you’re wondering which games actually support a monitor like this, the answer is, more than you might imagine. Space shooter Darius Burst Chronicle Saviours might be the first game that springs to mind and, indeed, it does fit the monitor perfectly but it’s far from the only title that benefits. Modern first person shooters that allow for enough adjustment of their field of view (FOV) often work well. Unfortunately many older titles suffer from too much barrel distortion, which makes objects at the side of the screen look stretched and distorted compared to those in the middle.
Racing games, such as Forza Horizon 4 are completely transformed and arguably play better on such a setup than with a virtual reality headset. Twin stick shooters like Renegade Ops or Assault Android Cactus are an absolute joy in ultra wide, as are the ever popular Trials series of motorcycle racing games. Even pixel art favourite Stardew Valley is compatible. Seeing the games beautiful picture art spread across such a huge monitor is like viewing some kind of pixel art tapestry.
Modern games aside, this monitor allows for some of the more esoteric arcade cabinets to be emulated in a much more faithful manner than can be done on a traditional 16:9 aspect ratio display. Classic arcade Darius works brilliantly, with no bezels in the way of the action as might be seen on a multi monitor setup (the original Darius arcade cabinet used a mixture of projection and mirrors to eliminate any bezels between the monitors). Other Mame games you might want to visit include Buggy Boy Deluxe (an extravagant three screen version of the popular retro driving game) and The Ninja Warriors.
Finally, a display like this has one more trick up its sleeve. By connecting two sources at once and selecting the correct mode, the monitor can act like two independent displays stacked side by side. Use this to your advantage to play LAN or link cable games, for instance.
It wouldn’t be fair to end this summary without touching on some of the monitors issues. Being LCD it does have a little backlight bleeding. Viewing angles aren’t terribly good, which isn’t a problem when using the display for work, but could be if you’re trying to crowd friends around for multiplayer gaming. The monitor also has a lack of inputs, having just two DisplayPort and one HDMI. An extra HDMI would have been particularly useful for those wishing to use the display for LAN gaming, for instance.
The monitor also has a somewhat awkward and slow to navigate menu/OSD. Navigating the menu is done by a small joystick type nub which sits under the monitor. The OSD is slow to appear and navigating with the single control is tedious. Finally, the HDR support offered by the display is somewhat sub-par when compared to our LG C9 OLED. The monitor we have in our setup is last years model, the more recent revision adds DisplayPort 1.4 which allows for VRR and full 4:4:4 RGB up to 120hz, though is still limited to HDMI 2.0. Having not tested the display we can’t comment if the HDR implementation is any better.
OLED – The light that drives into the future – LG C9
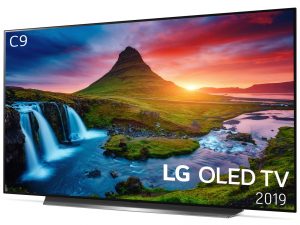
Much has already been said about the LG C9 and CX displays so we’ll keep this brief. With some of the lowest input lag, early support for HDMI 2.1, eARC and wide compatibility with the OSSC (though unfortunately not without squashing the aspect ratio in 4x and 5x modes), this TV is a solid choice for gamers both retro and modern.
It’s credentials as a TV for viewing video content aren’t bad either, with support for Dolby Vision, excellent HDR and fast, responsive versions of popular streaming apps like Netflix.
The model in our setup is the C9, which is the 2019 model. The 2020 CX keeps most of the features but adds black frame insertion, which can reduce motion blur to near CRT levels, at the expense of about one frame of input lag. If we could only choose one display for our room, this would be it.
Don’t forget the Dell
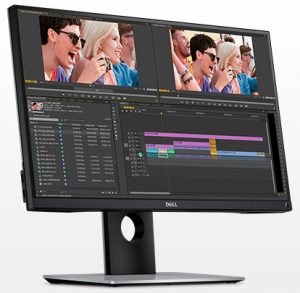
In the end we also added a fourth display, a Dell UP2516D that was from our old office in the UK. This display was used in portrait mode for playing a number of CPS2 titles that could not easily be rotated and played on any of our other displays. While better displays exist if you’re buying new, the UP2516D has low input lag, good colour reproduction and ample inputs which make this a solid choice to fill this gap in our display arsenal.
Making the most of your space budget
As with most projects like these, your budget isn’t just financial, it’s also physical. Unless you can afford to build a new extension or buy a new house, you will likely not have the space for every bit of gaming gear you ever wanted to own. Back in part one we talked about using software like LibreOffice Draw to create scale plans, and you should definitely do this at this stage too. Obtaining the dimensions of your display from the manufacturers website should be easy and you can then add them to your plan and make sure they all fit. Consider where the windows are in your room too, avoid placing displays opposite windows if you can, otherwise you will need to close the curtains every time you play. CRTs are particularly prone to reflecting light, so if you have to have a CRT opposite a window you should use black-out curtains whenever you want to use it.
In our particular setup we weren’t able to fit both the LG C9 and the Samsung ultrawide on the same wall, so we came up with a neat solution. TV-Lifts.co.uk make a series of mechanical TV mounts that allow you to store your monitor/TV inside a cabinet or, in our case, above the other display when not in use. This means the Ultrawide can be positioned in front of the OLED when it is in use, and moved above it when not, neatly solving that problem. A TV lift like this could also be useful in a games room for raising a flat panel display in front of a CRT, for instance.
With the monitors decided, the next step is to choose an AV setup, including speakers and receiver. We’ll be covering that in detail in the next article, which you can now read by clicking here.

